
Looking to learn more advanced stained glass skills or one on one private help? Join my Patreon - I dive into more advanced techniques there and you support me in the process of teaching you! (Patreon Link) .
WOW! It has been a hot minute since I’ve written a blog post! This year got so unexpectedly busy in a good way BUT this post one has been one I’ve been looking forward to for a long time mostly because I’m hoping I can learn myself from writing this out to help teach you :)! I’m not going to lie to you soldering is probably one of my weakest skills and after only making glass art for a couple years it’s the one I still feel I have the most room to grow in. I’m happy to say though it went from being the step I hated to the step that’s slowly becoming a close favorite to foiling! So pull out a notepad, take some notes, then give it a try so you can also become a semi-decent solderer like myself!
*Disclaimer: As an Amazon Associate, I earn from qualifying purchases. Thanks for your support :)
SOLDERING - UH FIRST WHAT IS IT?
Soldering can be defined as the joining of objects together by using a metal alloy. Let me break it down for you in a way that translates to making stained glass. Remember I told you about the use of copper tape and how lead binds to the copper tape and not the glass? Yeah! So soldering for us stained glass folks is the melting of lead (specifically a combination of tin/lead) to hold your stained glass pieces wrapped in copper foil together to make it one single project. Without lead soldering your art would just be pieces of glass. Playing with an extremely hot tool and lead can seem scary at first but I promise it’s not as intimidating as it seems once you get down to actually doing it!! Plus you’ll know how to manipulate liquid metal and that is kind of badass at least I think lol…
GETTING THE RIGHT SET UP IS EVERYTHING!
You heard me right, getting the right set up is EVERYTHING. Soldering is not as quick as a step as many of the other small steps you take when making stained glass. For that reason it is important you have all the best tools to make sure you are comfortable as well as safe while you work! I also like to say when you get to this stage your project is about only 2/3rd’s of the way done because soldering is the most time consuming step and you do not want to speed though it. Speed = instability and a sloppy final project which again friend, we most definitely want to avoid with all the time + love you have poured into your glass creation. It should be noted that soldering is a bit more labor intensive and potentially more toxic than the other steps you’ve completed so far too. It involves toxic flux fumes, a hot tool that runs at hundreds of degrees, and lead exposure. So in case there is any question whatsoever - this is something that should NOT be done in your living room or inside your house if you can help it (unless you have a designated studio room). Something I’ve run into while working with older glass folks when teaching new students is they don’t worry as much about the toxins they’re exposed to and so they make the mistake of not educating their students to some of the dangerous materials you need to protect yourself from. I am here to do that so you can decide what safety precautions you’d like to take. It’s very possible to be safe when making stained glass it just takes a few extra steps :). So without further ado let’s chat about my favorite key items for having a comfortable + successful soldering set up!
- Ideal Soldering Space - Seems easy enough right? Well it actually takes some extra thinking. Again soldering is a bit more labor intensive and potentially toxic than the other steps you’ve completed. Not only does involve some toxins you also are going to be doing it for possibly an hour + depending on the complexity of your project so you need make sure your body is comfortable while doing it. Expect to stand for a long time and getting a little messy - close toed shoes and some comfy grubby clothes are a must. You may end up splattering some lead on yourself and don’t want it to burn your nice street clothes or worse burn your feet (I have had both happen - it does happen - don’t be a fool like me). When it comes to actual work space I would recommend a workbench in a garage or if the weather permits a back-porch work table that you aren’t hunching too much over. You may not be lucky enough to live in year-round perfect weather conditions like some folks so it might take a bit of work finding a way to keep yourself and your iron warm (i.e. space heater in the garage). I promise though this is the smartest thing you can do. If you happen to be a lucky duck with an extra art room to work in the next thing you’ve got to think about is ventilation. Time to ask yourself does your room have a window or a sliding door? If it’s a warm day keep that door/window open while you work, if it’s too cold to keep the door open you have to find a way to keep that air ventilated while you work - I will speak more to this below. A perfect soldering set up takes some planning but once you have it down you’ll have a tried and true set up you can use every time.

- Safety (ALWAYS)
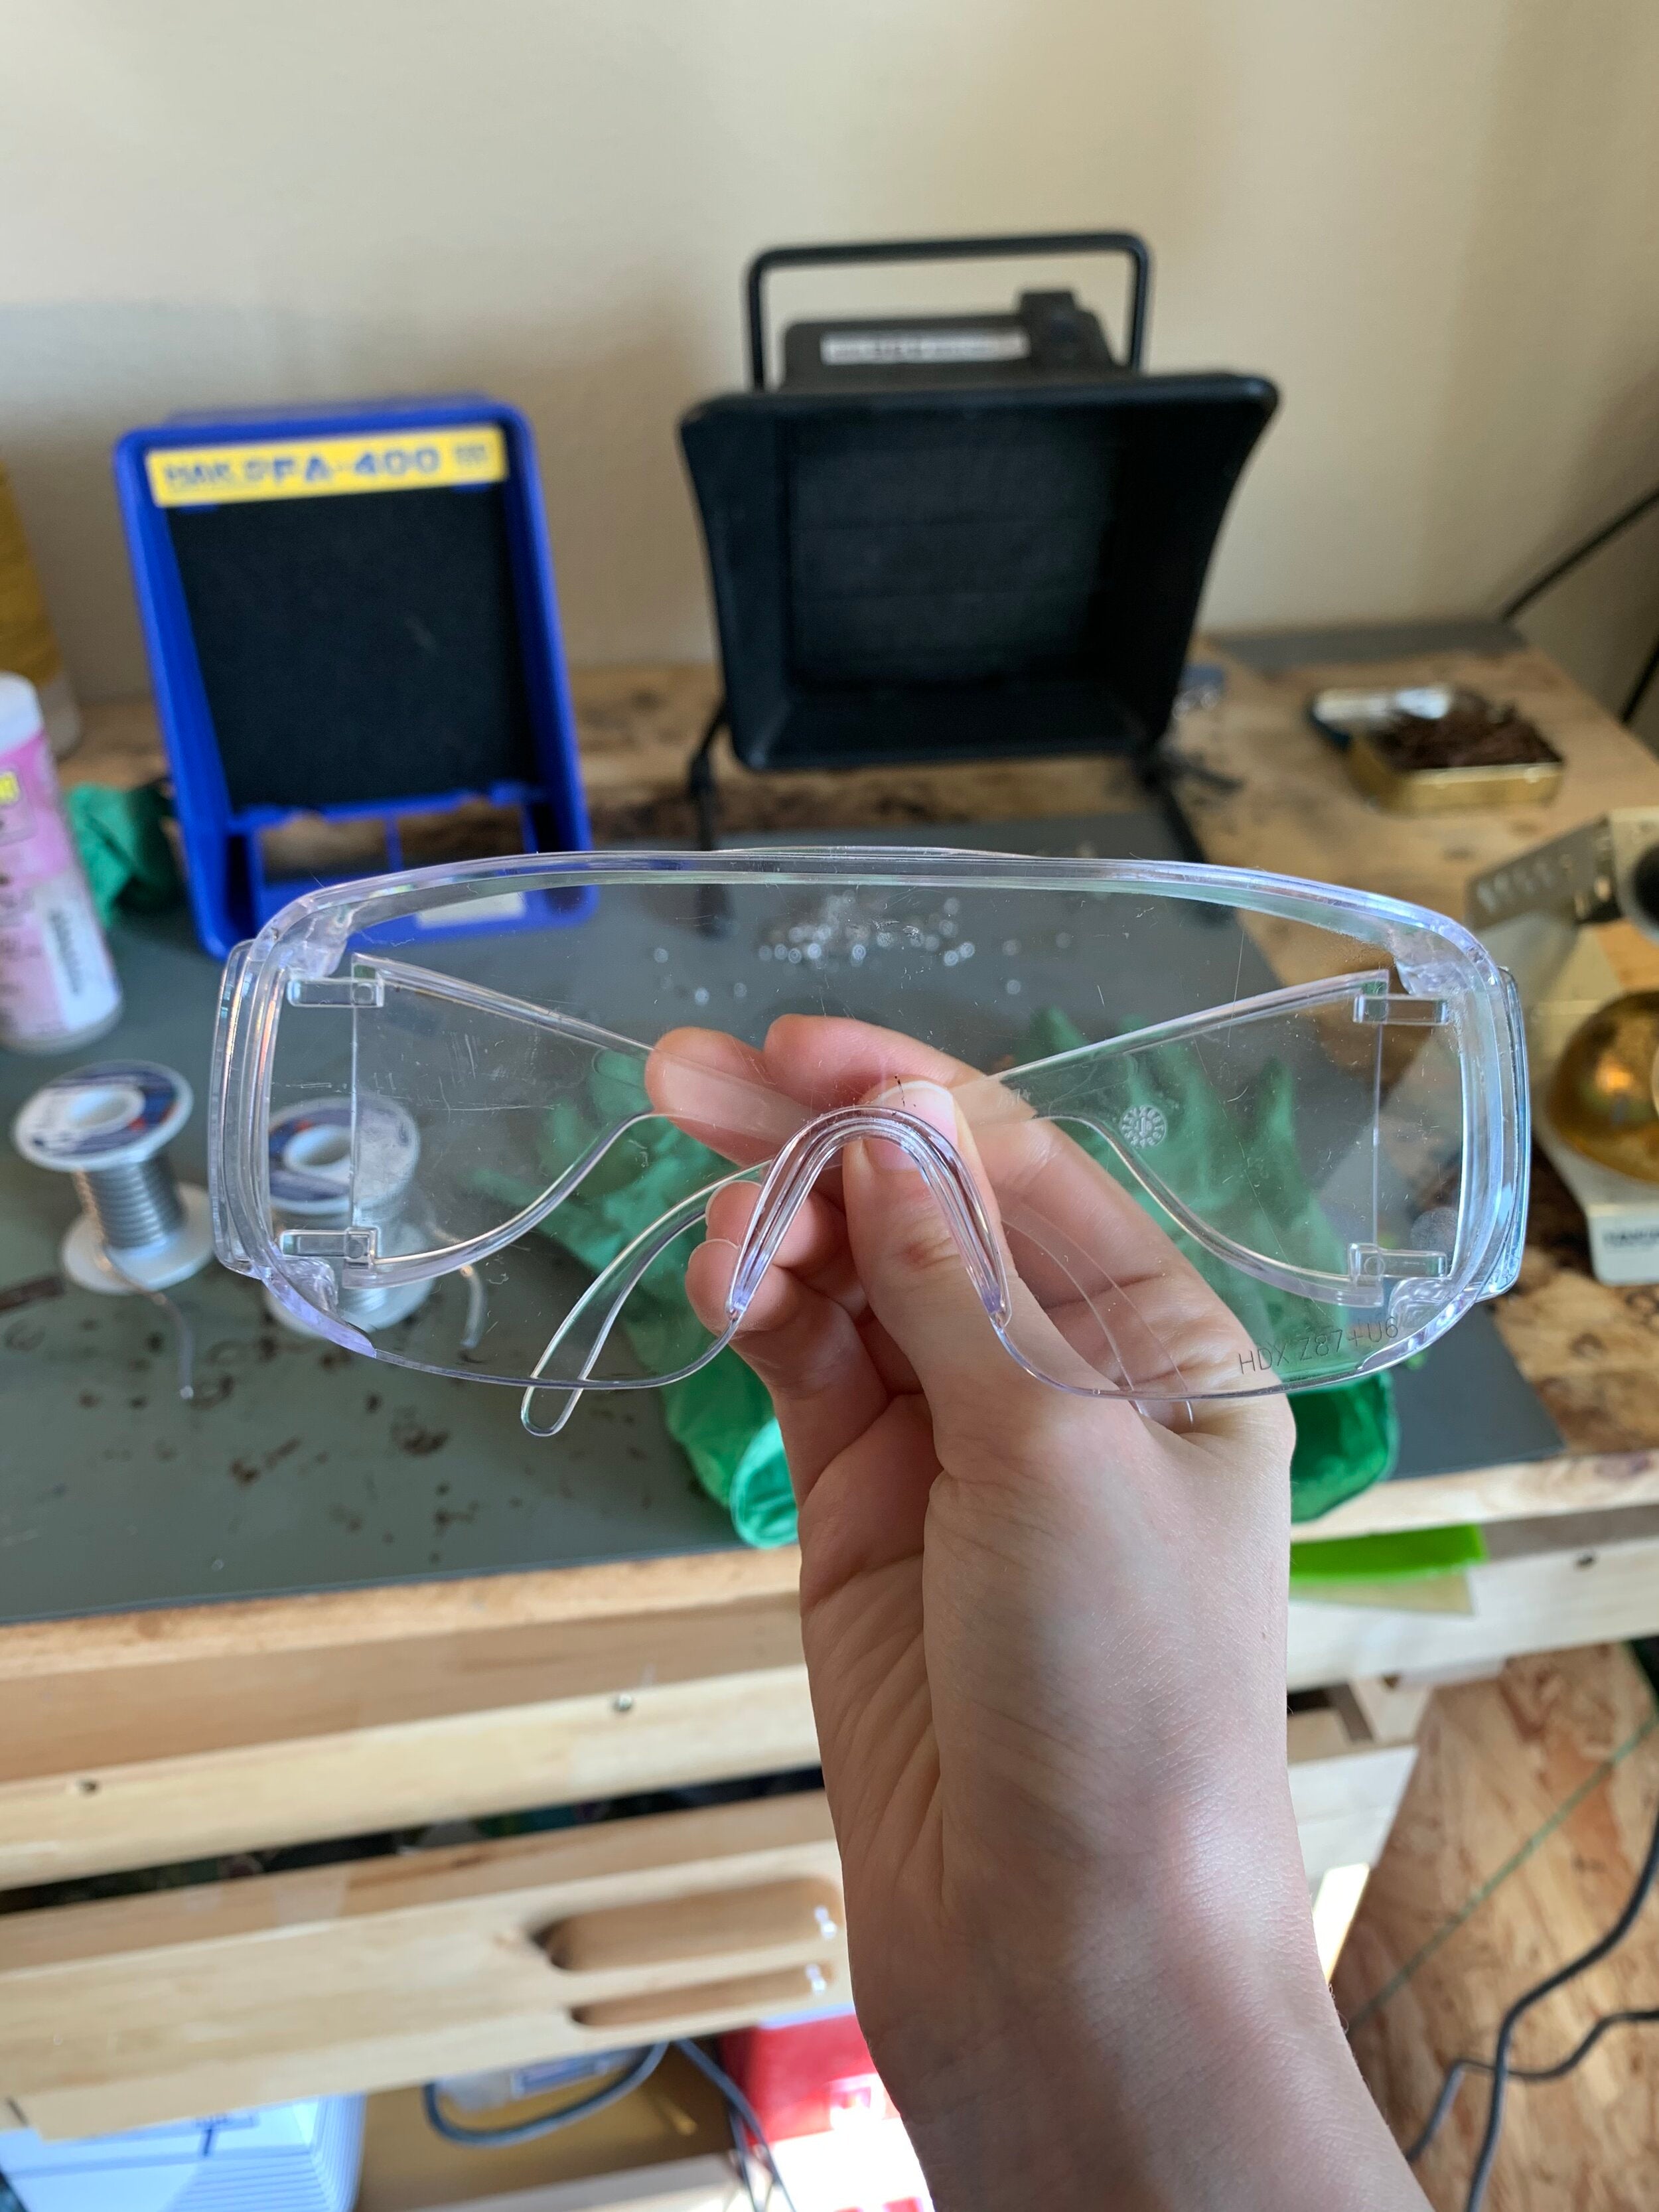
Eye Protection - protect those amazing eyes of yours from unexpected lead splatters, it should be a no brainer especially with knowing you'll be working with liquid metal. And if you don't already have a pair at this point, get some NOW (find on Amazon) .
Fume Mask - I like to wear a fume mask to prevent myself from breathing in flux fumes and possible lead fumes. NOTE: Due to COVID - 19 it has been incredibly hard to find any sort of face mask, I reccomend if you cannot find it online or my links aren't working check out your local hardware store or Home Depot they should be sold there! MASK: (find on Amazon) . and CARTRIDGES: (find on Amazon) .

- Good Soldering Surface
Sturdy Wood Board - I have used this as my soldering surface on my work bench/garage floor for years. Make sure you have a good piece of thick wood that won’t warp from the heat. I have found a wood board is easy to use as a soldering surface.
Soldering Mat - For those of you that want an upgrade to your soldering surface a soldering mat is a great option. The lead rolls right off and doesn’t get stuck additionally it is easier to clean and doesn’t get warped from the heat overtime (find on Amazon) .

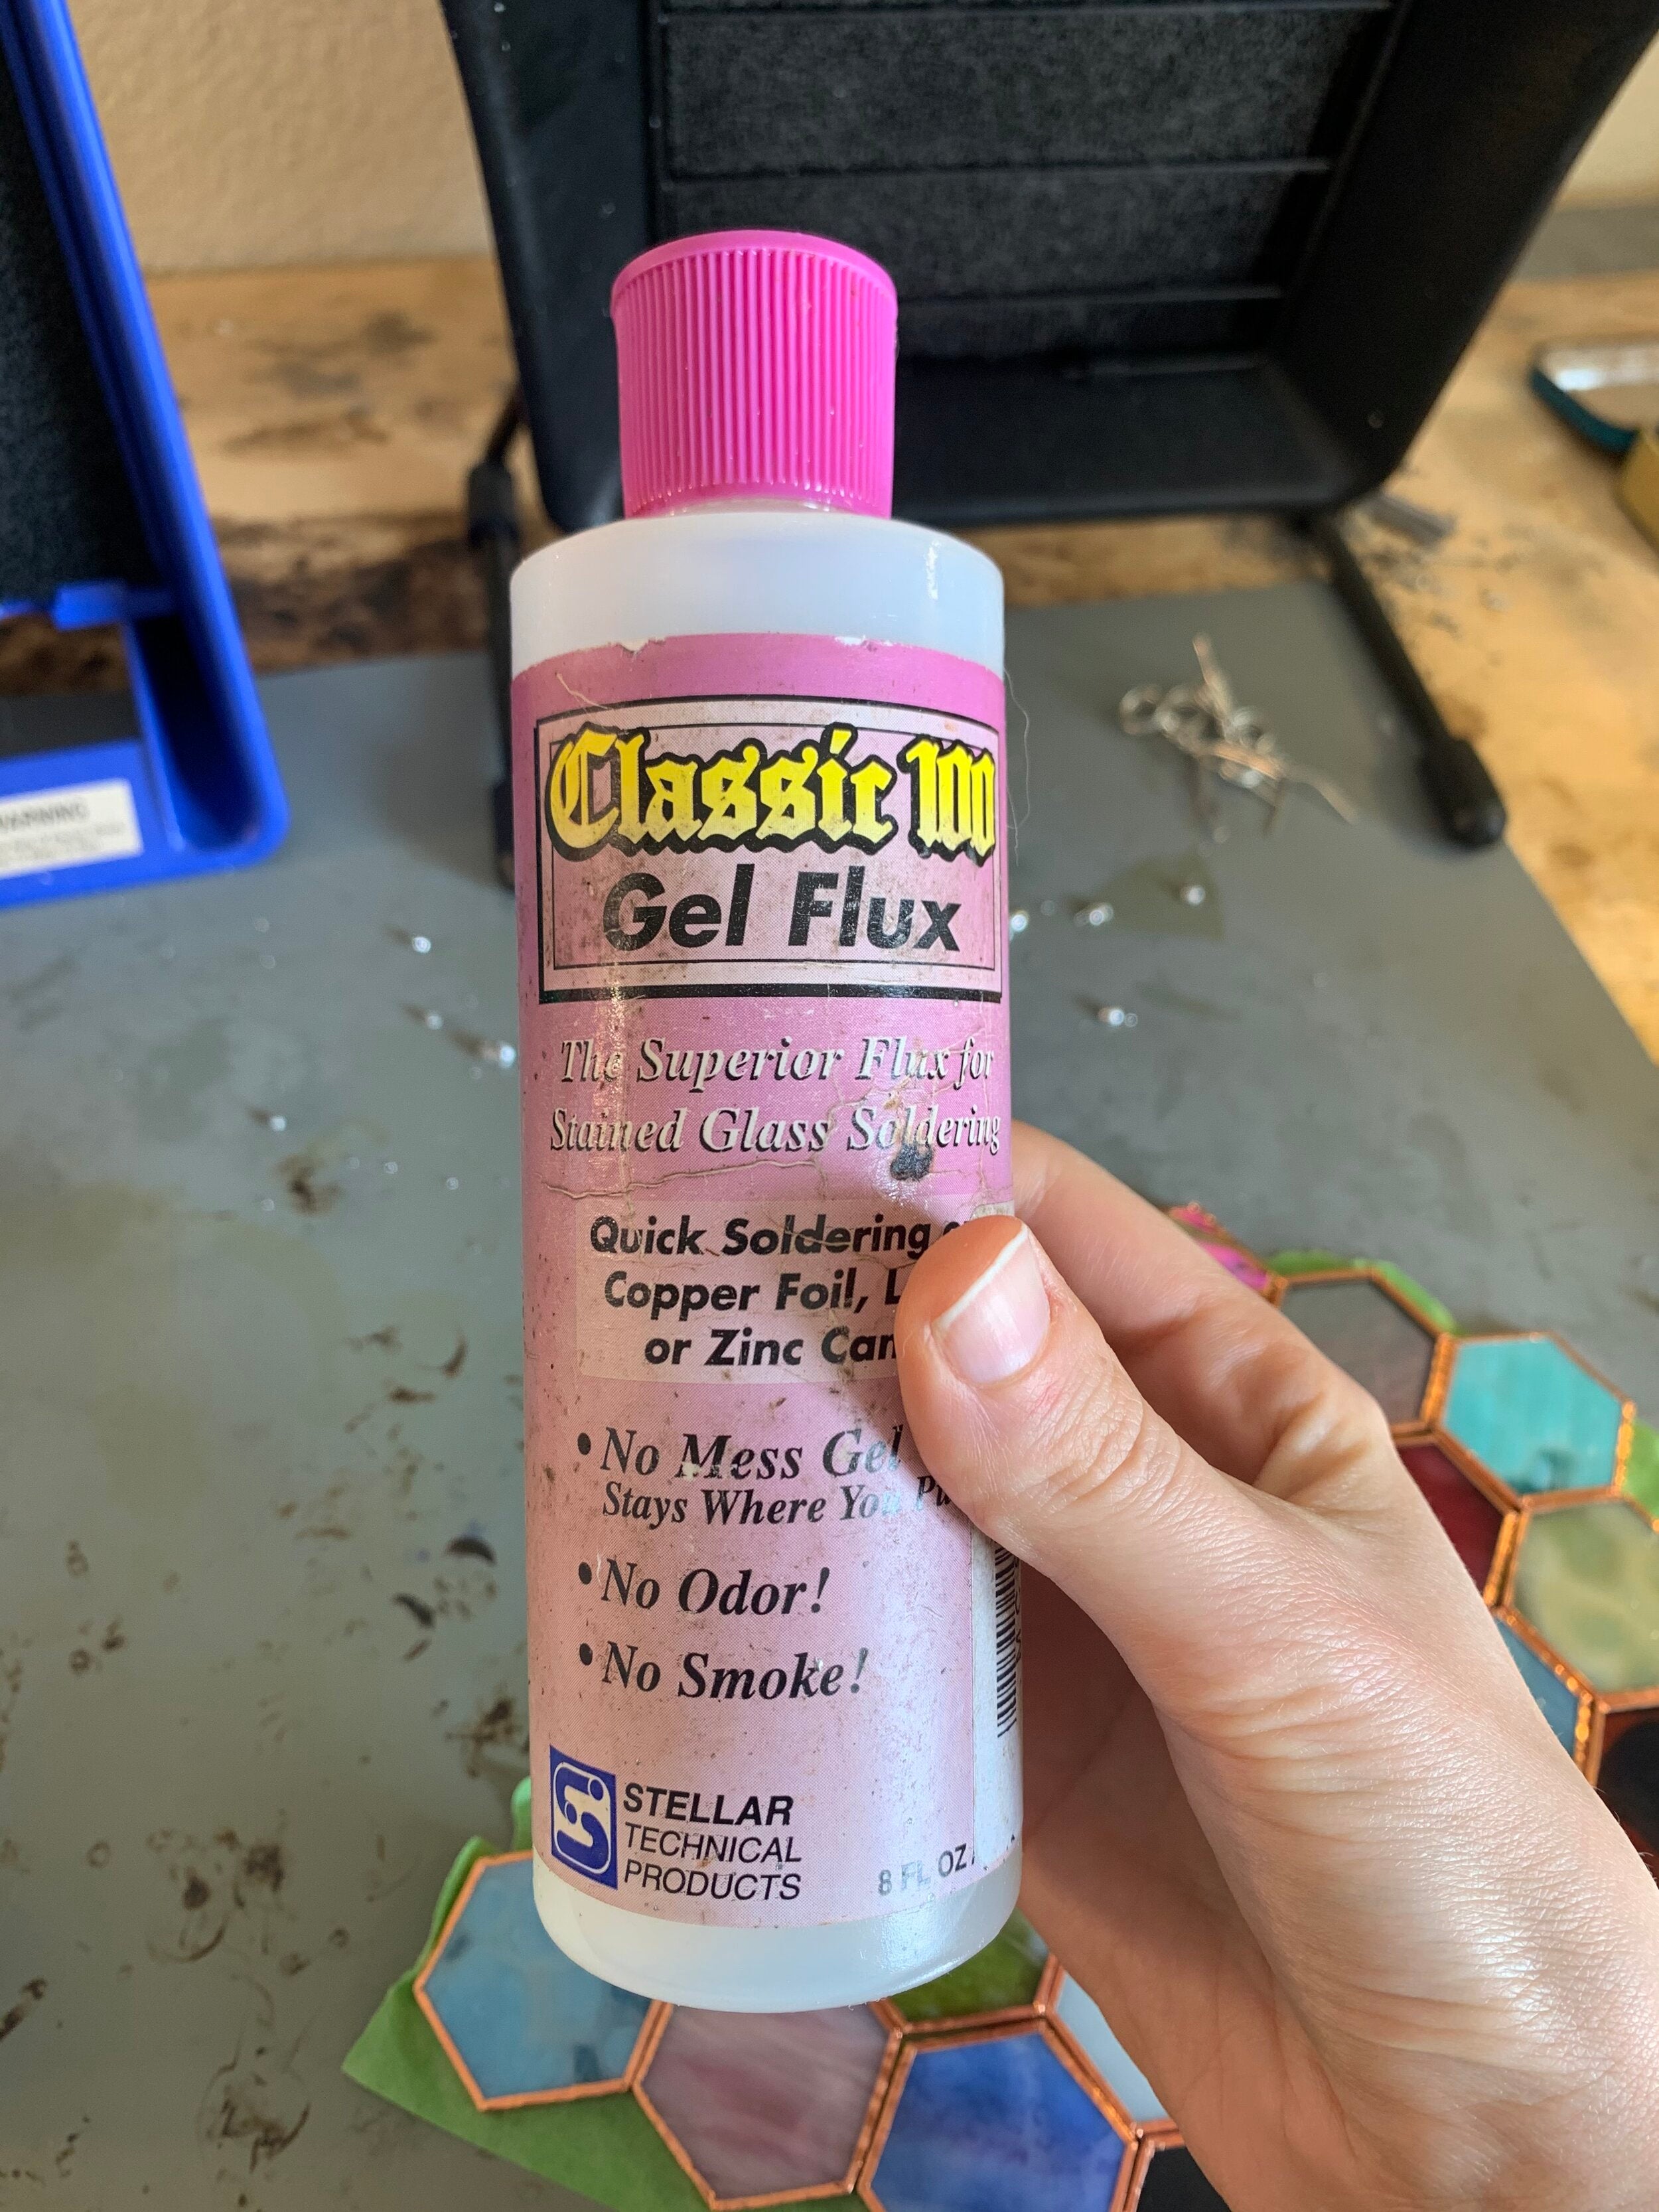
- Flux and Flux Brush - A chemical agent that is going to help your copper foil and lead stick together, you’ll want to use a bush to apply it, any old brush will do! P.S. I like to wear disposable gloves when I flux, flux is acidic and can irritate your skin and just has an icky feeling in my opinion (find on Amazon) and (find on Amazon) .

- Fume Extractor/Smoke Absorber – This is going to work to pull the flux fumes away from you as you work. They aren’t good for you to breathe in and can cause headaches. Fume extractors pull and filter the fumes, and no a box fan will not work as a substitute because they will just push the fumes around the room while a fume extractor will actually filter them. For the most part you won’t have to worry about lead fumes unless you are soldering above 1000 F /480 C degrees (which is very unlikely as a hobbyist) (find on Vaulcan directly) . Bonus: Take 10% off your purchase with code COGW10

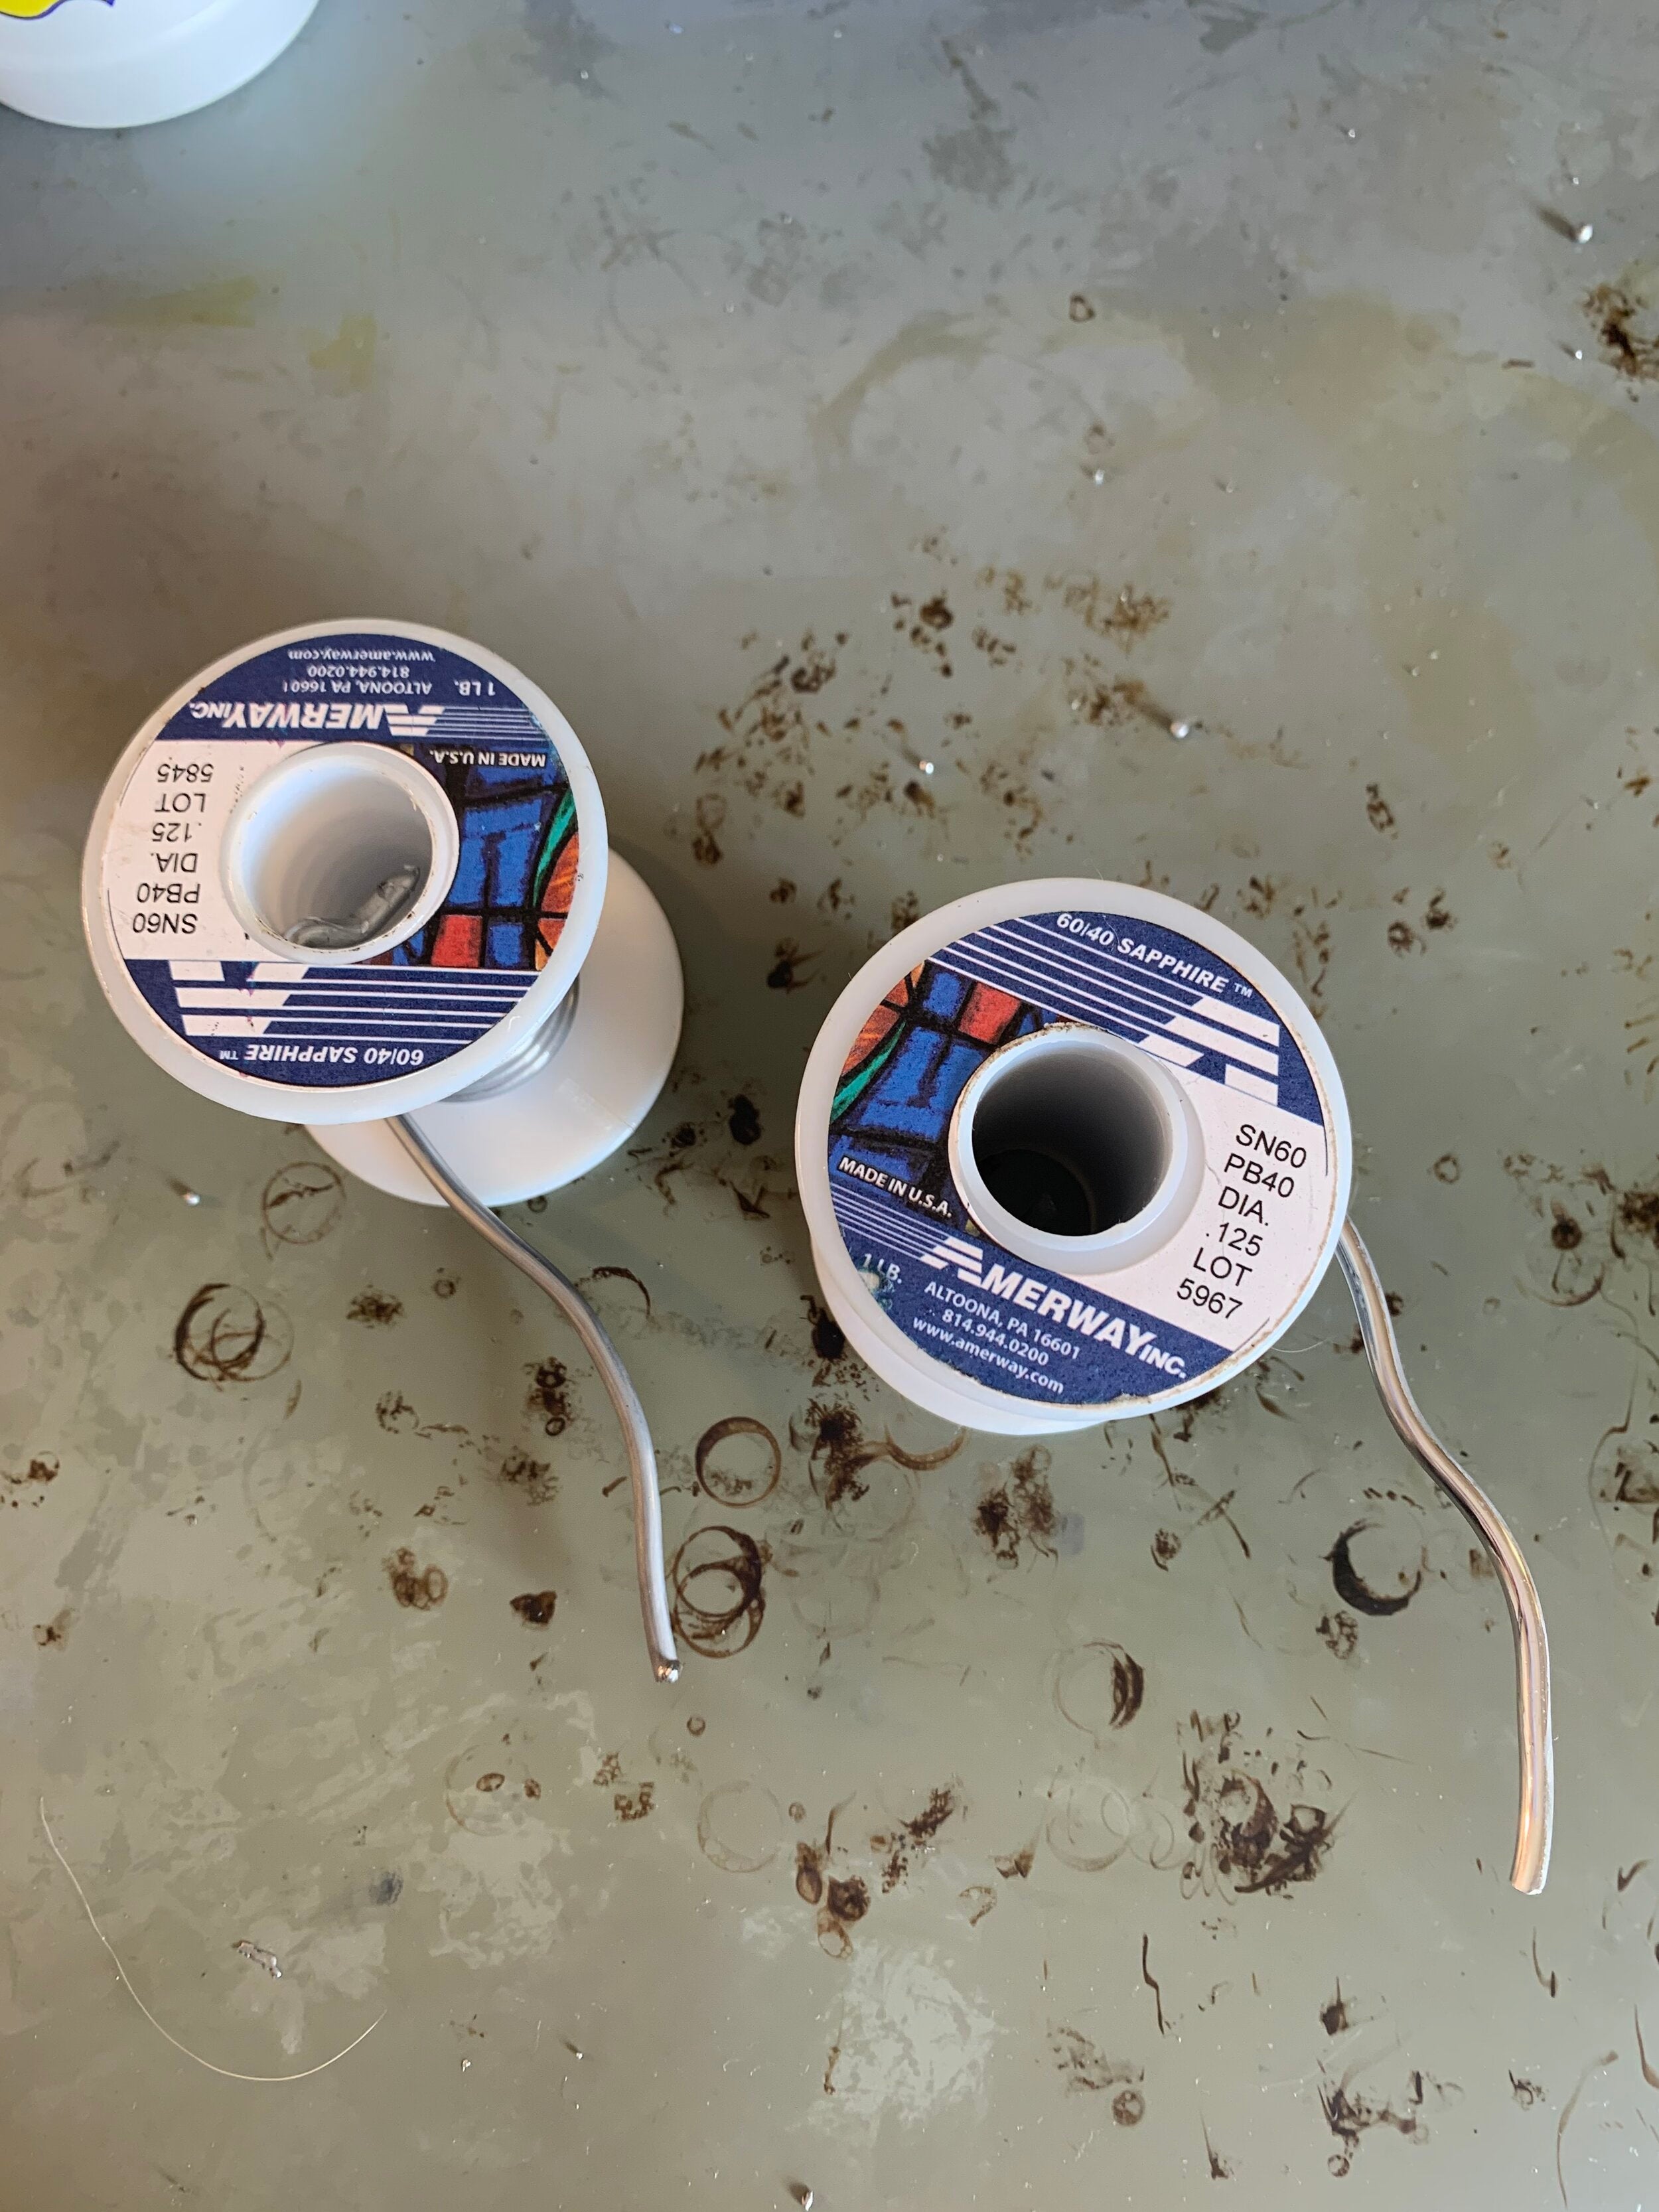
- Lead (60/40) – This spool of tin/lead is what you are going to melt over your project to have it firmly hold together. Make sure you have purchased lead meant for stained glass and specifically 60/40 not 50/50. The difference is important. 60/40 is better for stained glass leading in general while 50/50 is better suited for us when it comes to decorative soldering. NOTE: There is lead free solder, which I myself have not used. I can’t say I have heard great things about it and generally I guide other artists to avoid it. For your project stick to lead 60/40 solder (find on Amazon) .
- Soldering Stand and Tip Cleaner – It’s going to be necessary to have a holding spot for your iron as you work so in comes a handy soldering iron stand. Also each time you go to solder you will need to every so often clean the tip of your iron so the lead flows smoothly. When it comes to cleaning you can pick between using a wet sponge or brass wool to clean it off – I much prefer the brass wool. I personally like to use Hakko’s 633 Iron Holder with the 599B Tip Cleaner because it’s a two in one (find on Amazon) .

- Soldering Iron - If you take something away from this blog post I want it to be this little snippet. Other glass artists ask me all the time how they can get better at soldering and/or what my secret is to get clean/smooth soldering lines. So here it is: IF YOU WANT TO MASTER SOLDERING YOU NEED A DAMN GOOD SOLDERING IRON. For best of the best look no further than Hakko’s FX-601 soldering iron. This soldering iron may carry a larger price tag than others on the market but its for a good reason - it’s a high quality iron with an internal temperature control. One of the best ways to get those perfect smooth soldering lines is having an iron that keeps temperature constant and consistent. Almost all other soldering irons out there are a one temperature only iron. The FX-601 allows you to change the dial right on your iron to find thee best temperature for you. The ability to do this grants you for so much range when it comes to soldering. I like to keep my iron on the hotter side, so being able to kick an notch up when I solder to get those perfect lines then dial it down when I do decorative beading - let the angels SING. I could just gush about how much I love this iron it really is my favorite tool and if you are a fellow glass artist finding yourself frustrated or wanting to start your stained glass journey off the right way trust me you MUST invest in this iron, it is a complete game changer. I truly feel it helped take my art to the next level once I started using it (find on Amazon) .


-
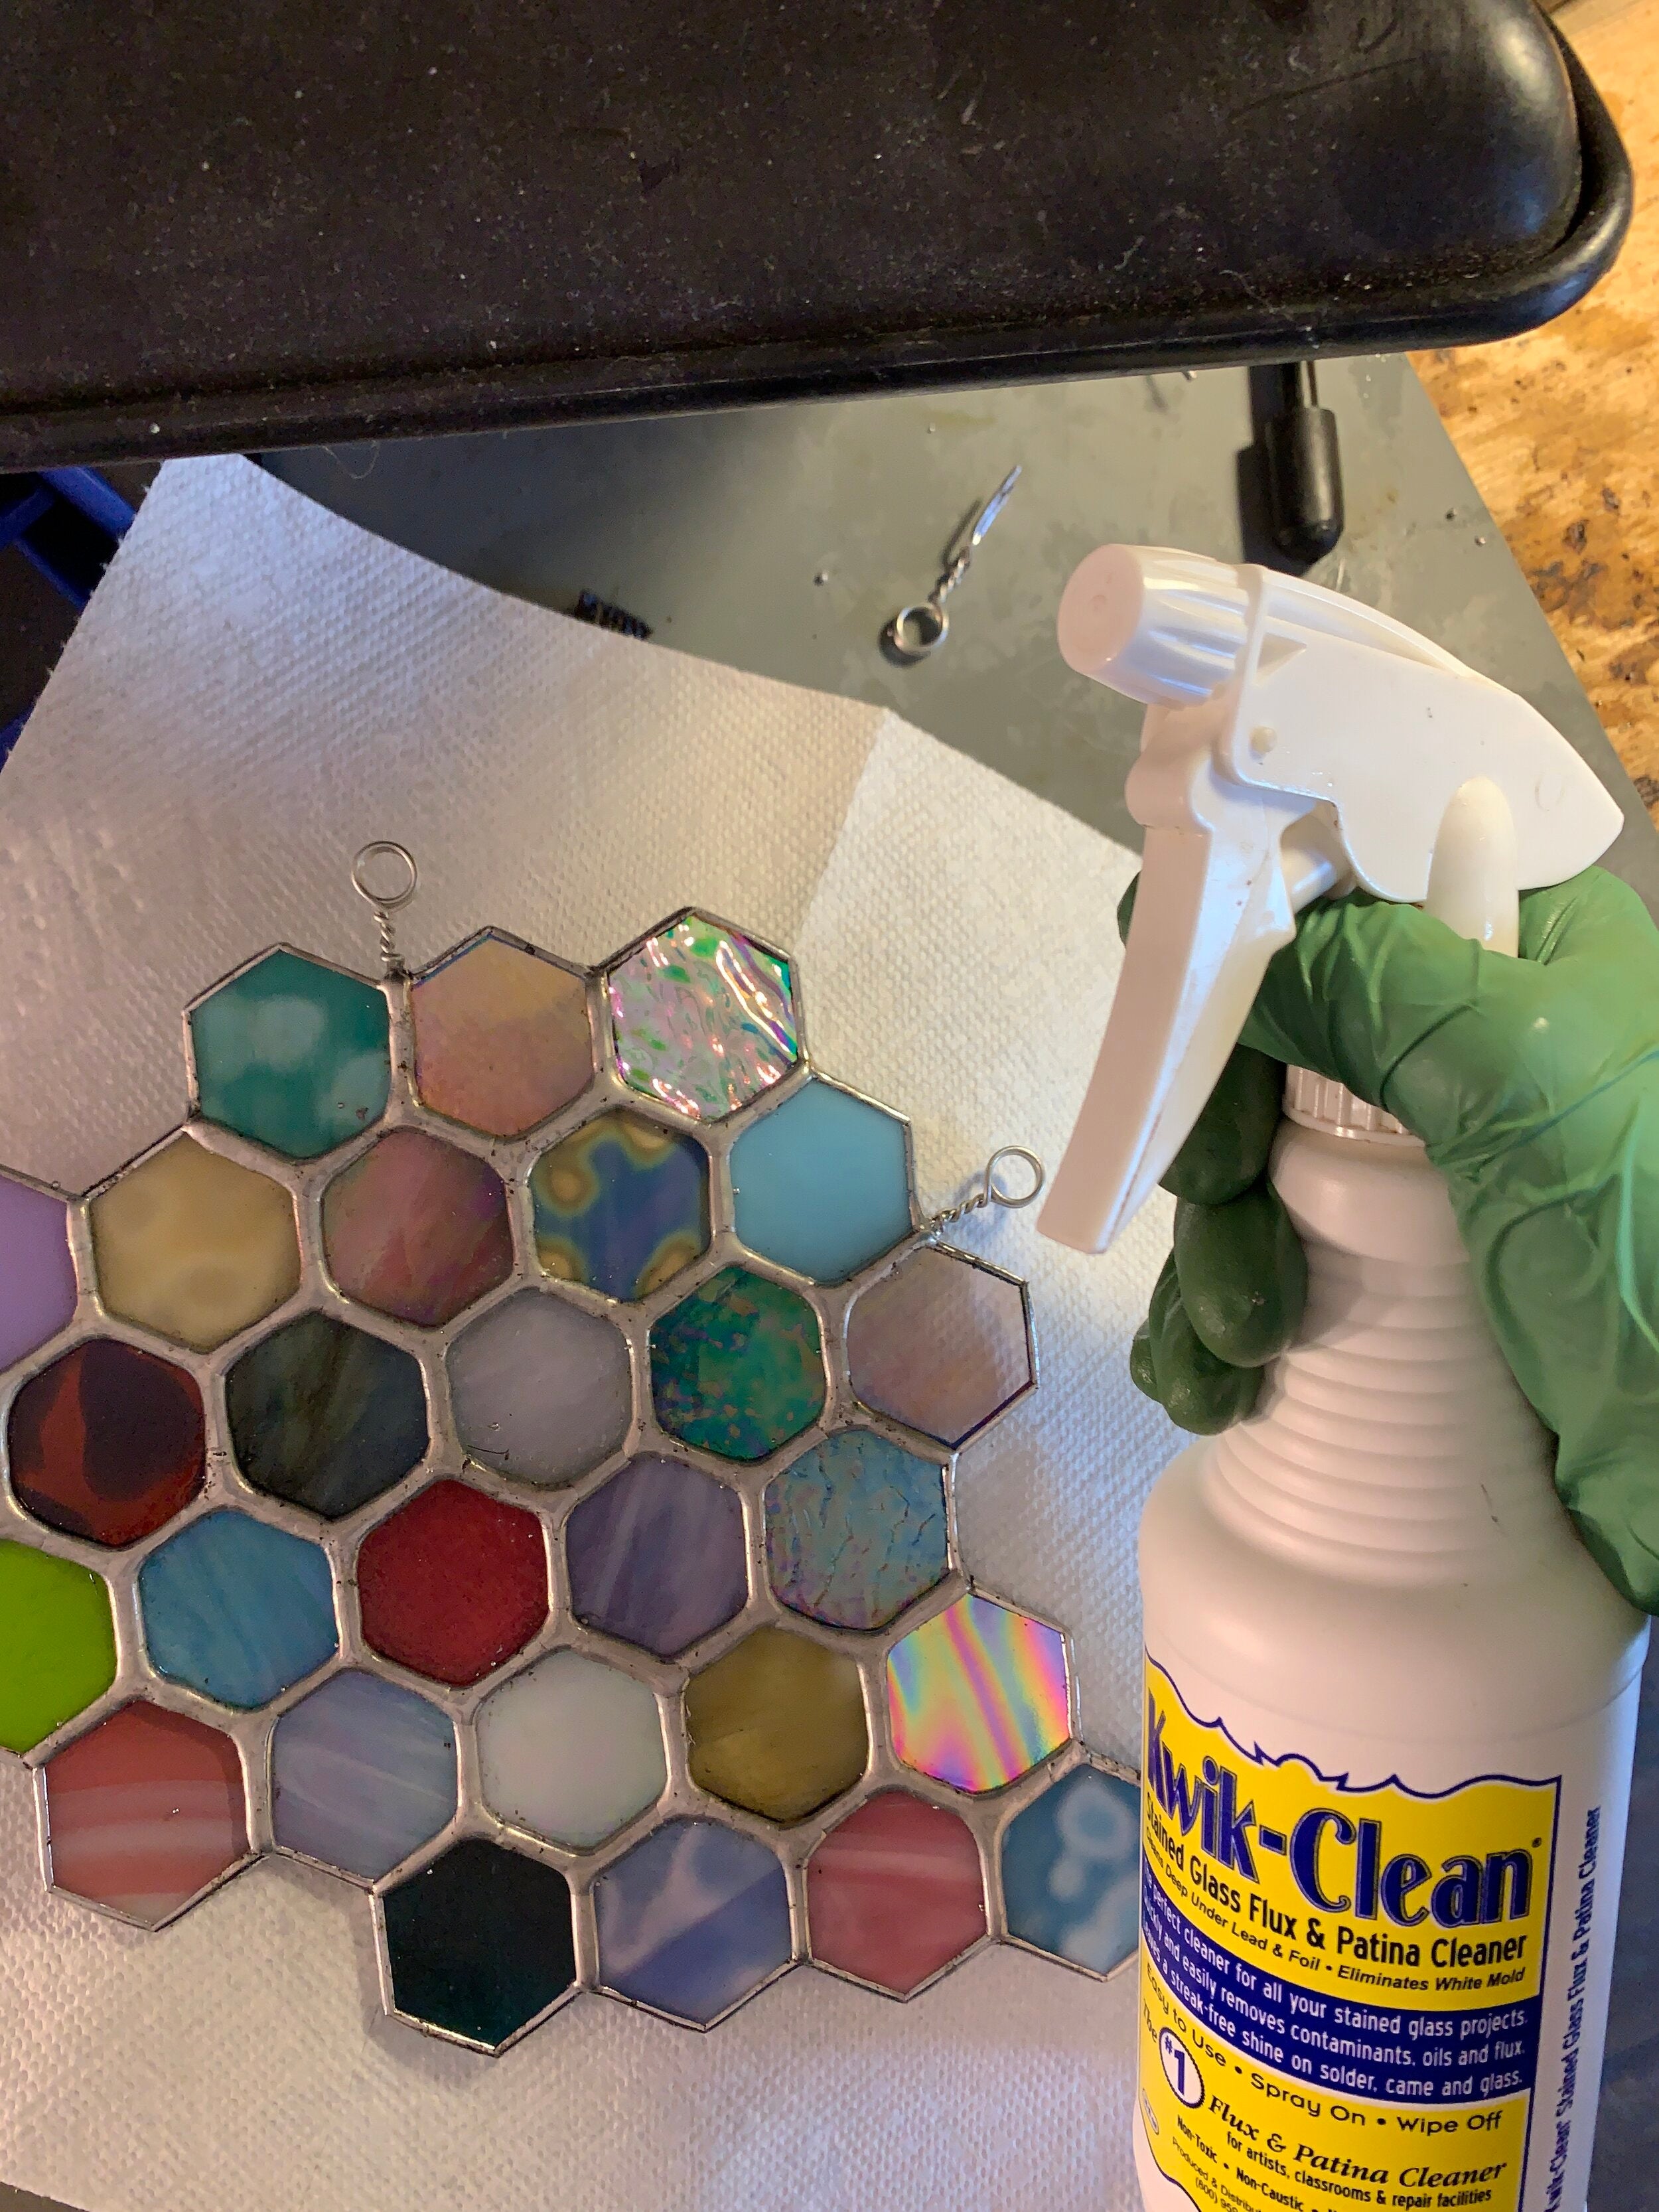
Flux Cleaner - At some point we need to remove that pesky flux from our project or it will cause oxidation to happen on our lead. I highly recommend using Kwick Clean to clean after soldering (find on Amazon) . It does a fantastic job of removing flux. If you are outside of the US/Canada and don’t have Kwick Clean you can always use Windex and 90% isopropyl alcohol instead, I recommend double cleaning (windex then alcohol x2).
-
Gloves - Its important to wear gloves to protect your hands from the acidic flux that will irritate it. Plus wearing gloves makes for a much easier clean-up (find on Amazon) . NOTE: With COVID-19 it has been very hard to find gloves if you cannot find any online or my links aren't working check your local pharmacy or hardware store.
-
Paper Towels - Handy to have once you’re completely finished soldering. You’ll use them to clean off that flux and if you opt to wash your project with soap and water once you are finished I use paper towels to dry my projects too!

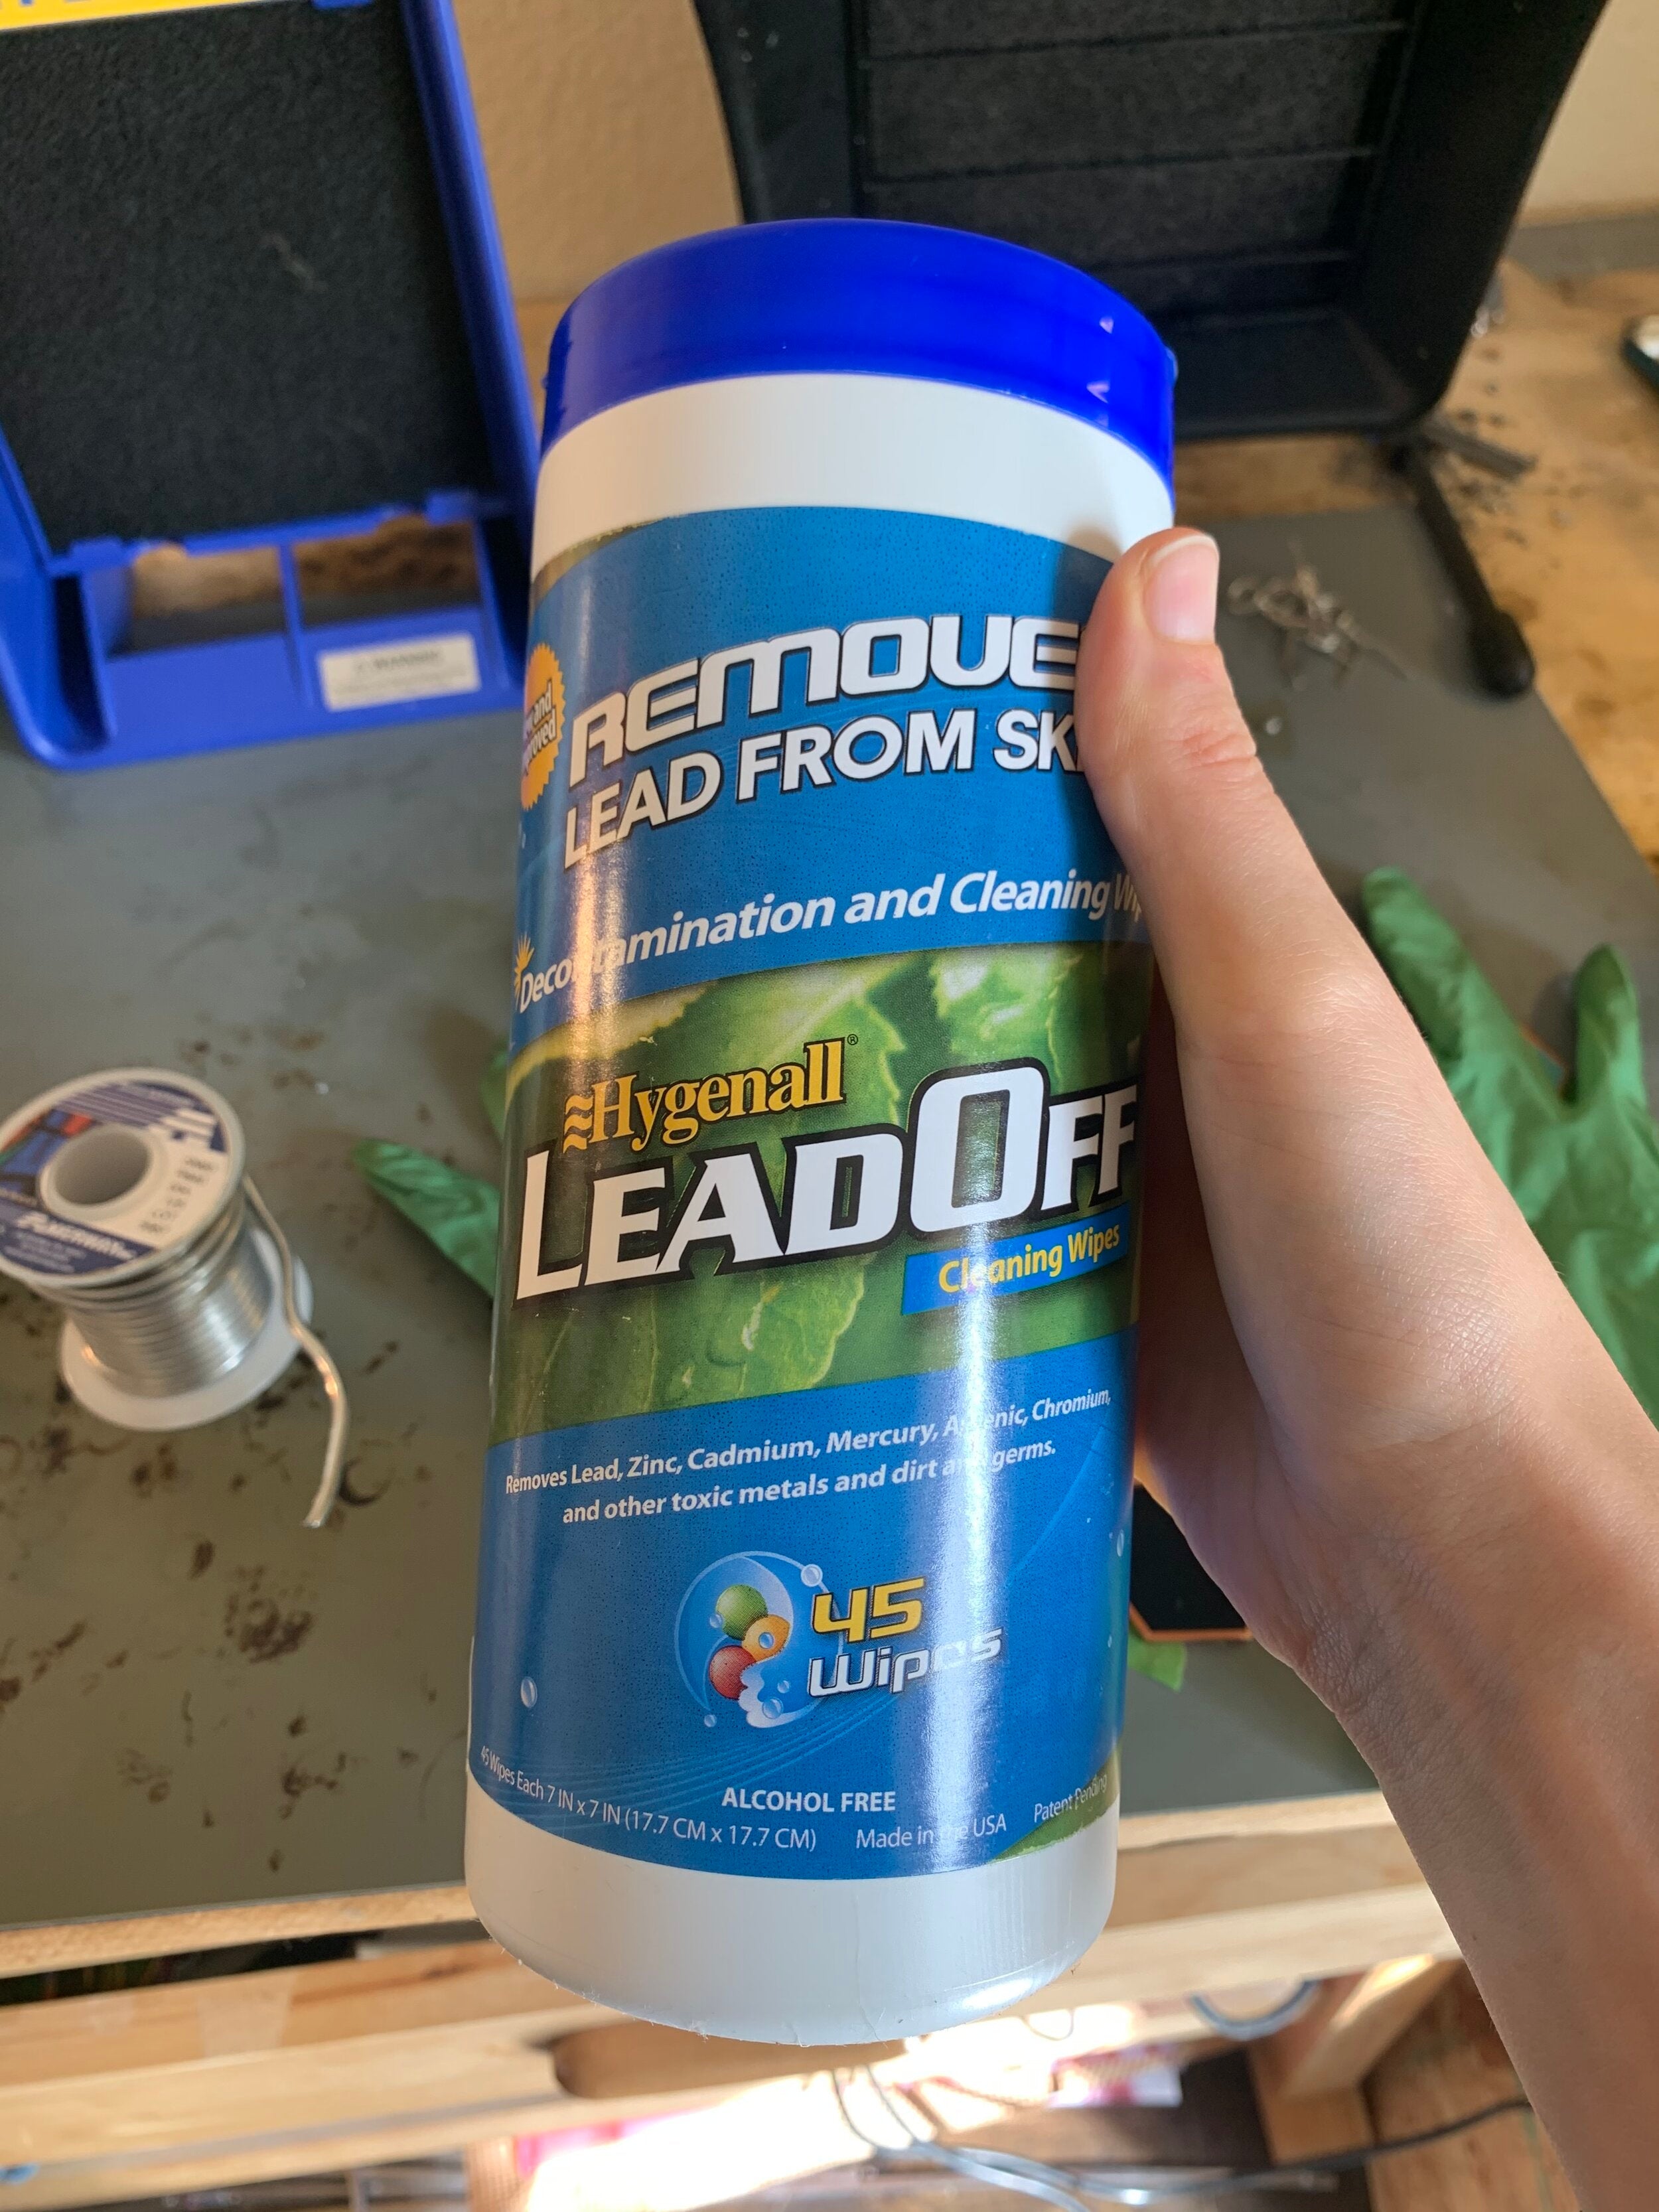
- Lead off Wipes (suggestion) - When you’re messing around with lead its really important to be as safe as you can. In addition to washing your hands when you have a lot of lead exposure its important to have a way to wipe the dust and chemicals off yourself. From what I understand lead can be sometimes tricky to get off. These lead wipes are amazing I use them all the time to wipe down my phone or hands after touching lots of lead. These wipes also happen to have a nice smell to them. The brand I like to use (Hygenall) seems to be sold out these days here is a great alternative brand I reccomend (find on Amazon) !
TIN FOR THE WIN
Disclaimer: this is how I like to solder a project but there are many other ways to do it figure out what works best for you :)
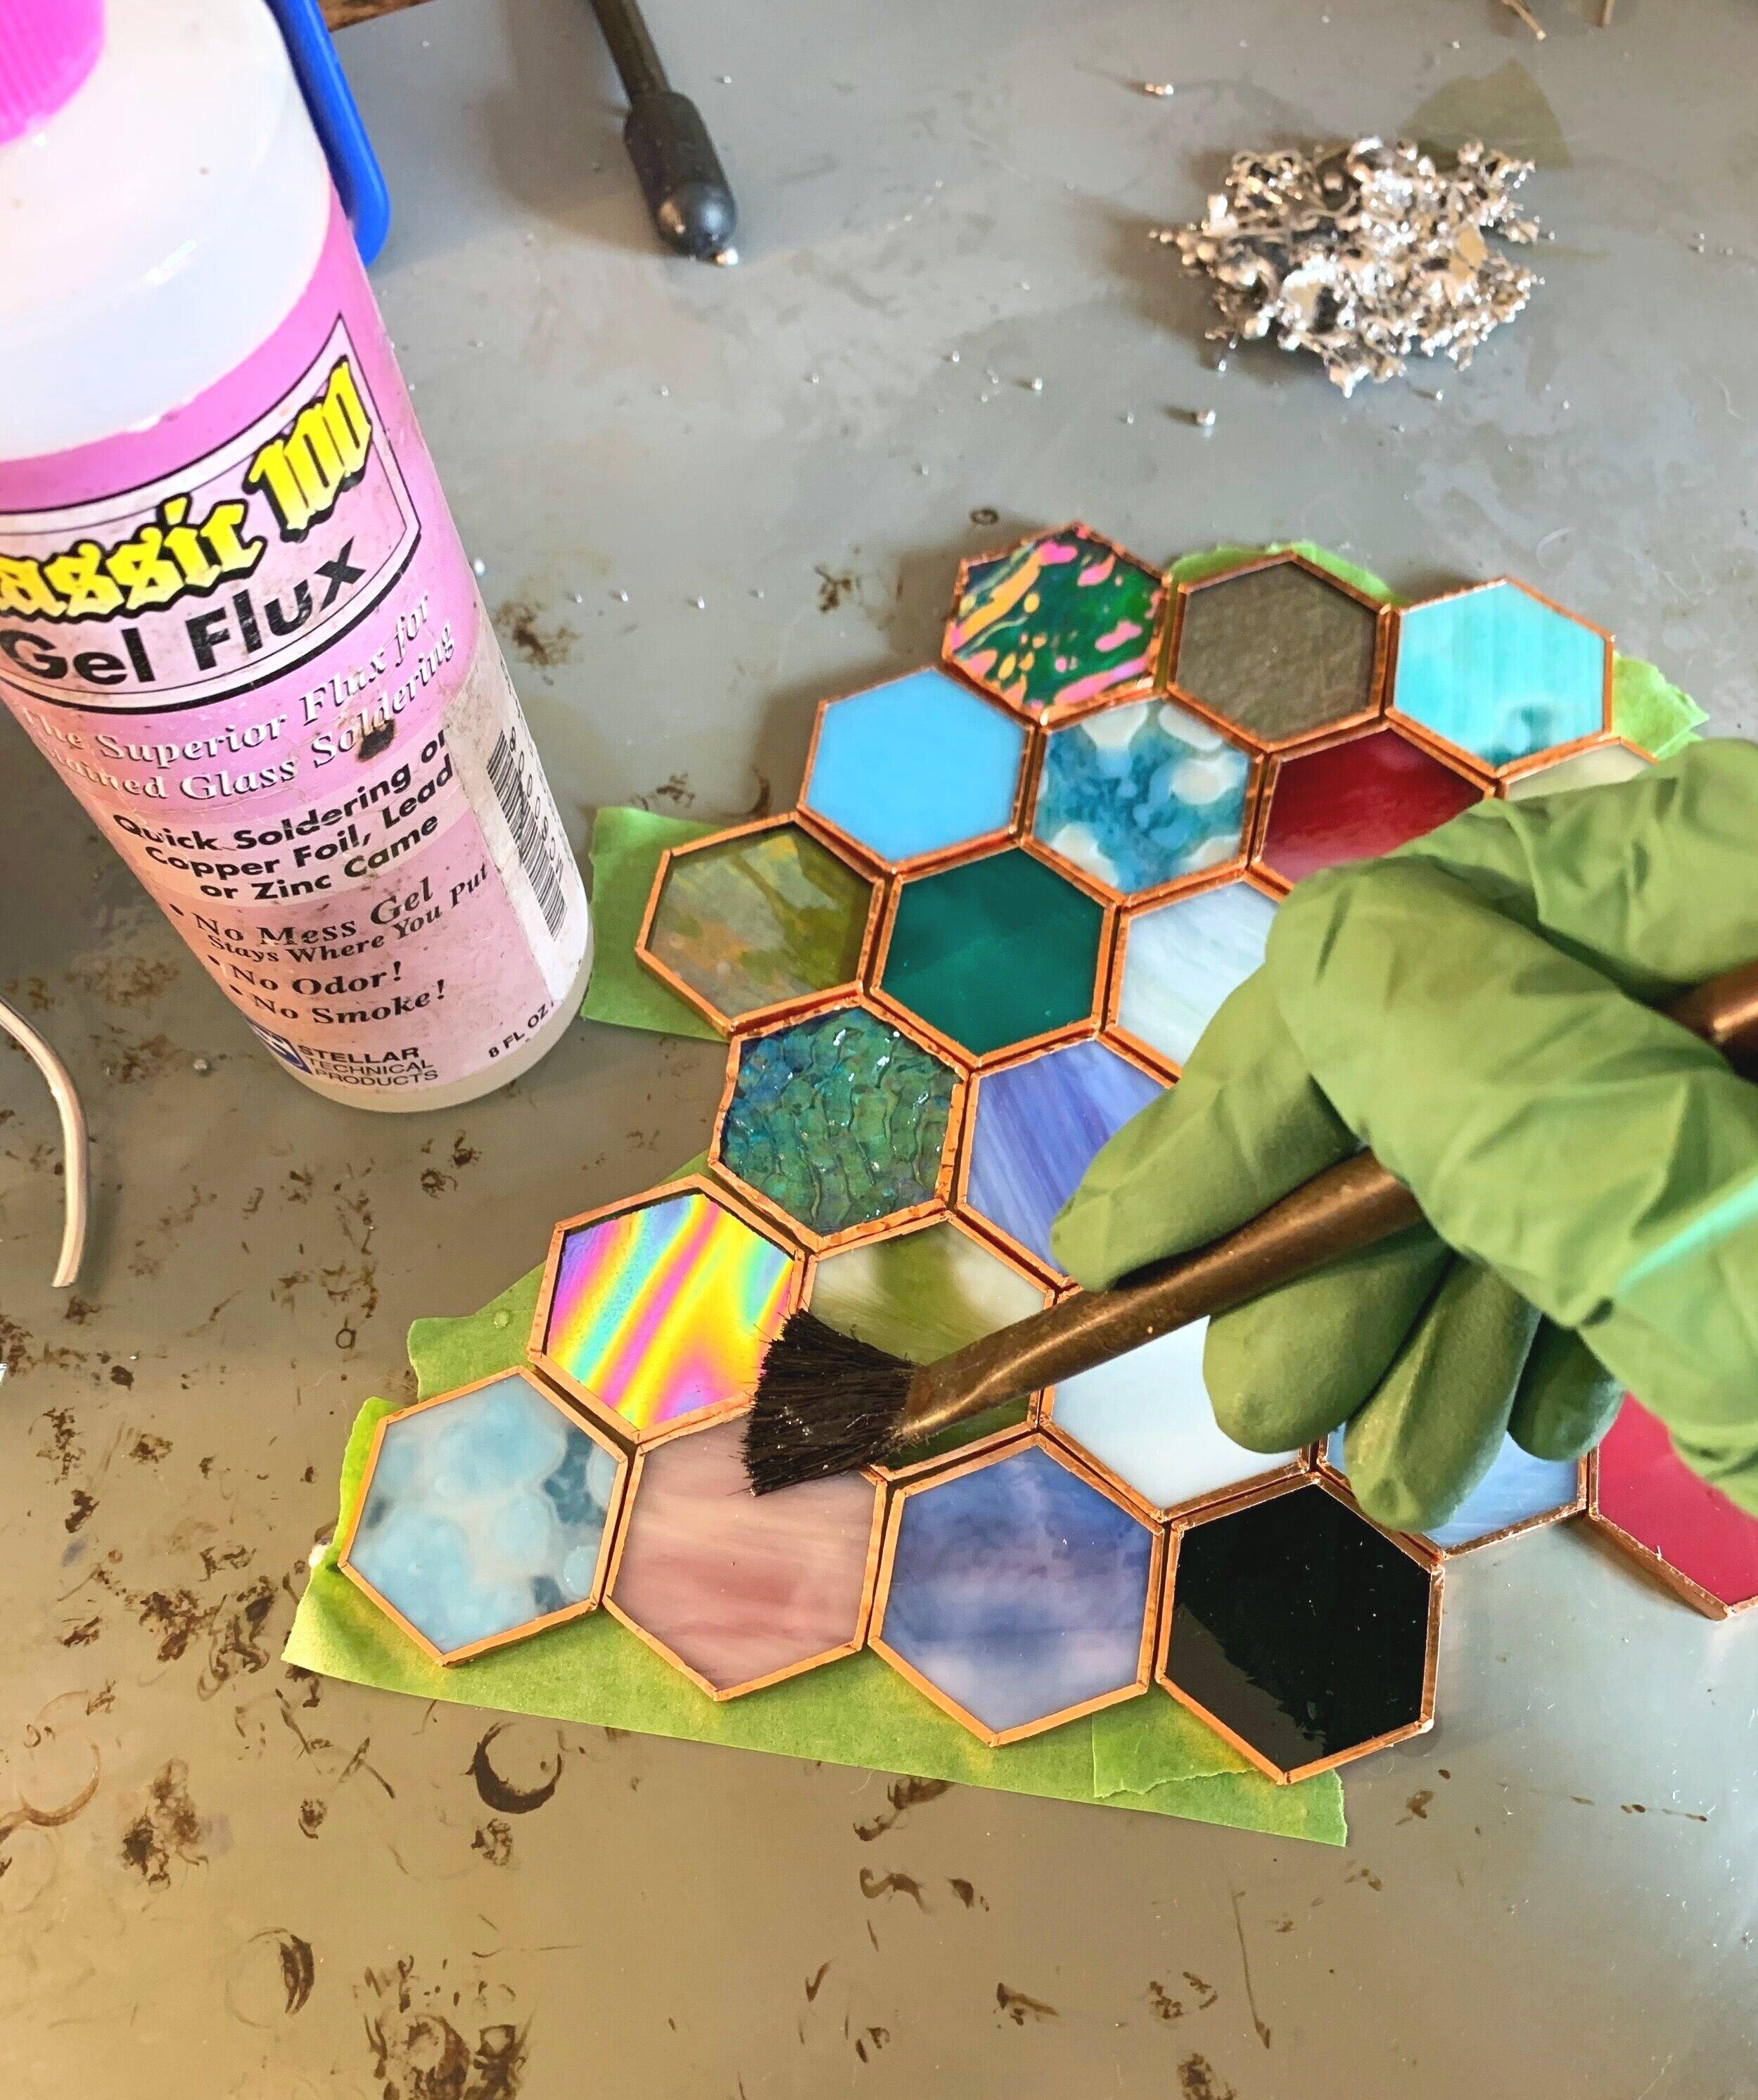
Now that you've got the perfect set up + all the tools to you need to solder its time to get melting that metal on your project and turn it into a real stained glass piece! If you remember where we left off on my last blog post about foiling (click to catch up), you had taped your copper foiled pieces together and they were ready to be soldered. First you're going to grab that handy bottle of gel flux and squeeze some directly on to your flux brush. You will liberally apply the flux all over the area you are going to solder. If the project is small enough I prefer to cover the entire project in flux, if its a larger project I will flux as I go, only adding flux to the area that I will be soldering first so it doesn't dry up. If this is your first time soldering check out what its like when you melt lead onto your project without flux it is really tricky, it doesn't want to stick or sticks inconsistantly. Now add some flux and its like magic, it sticks right to that tape like a magnet - thanks SCIENCE!!
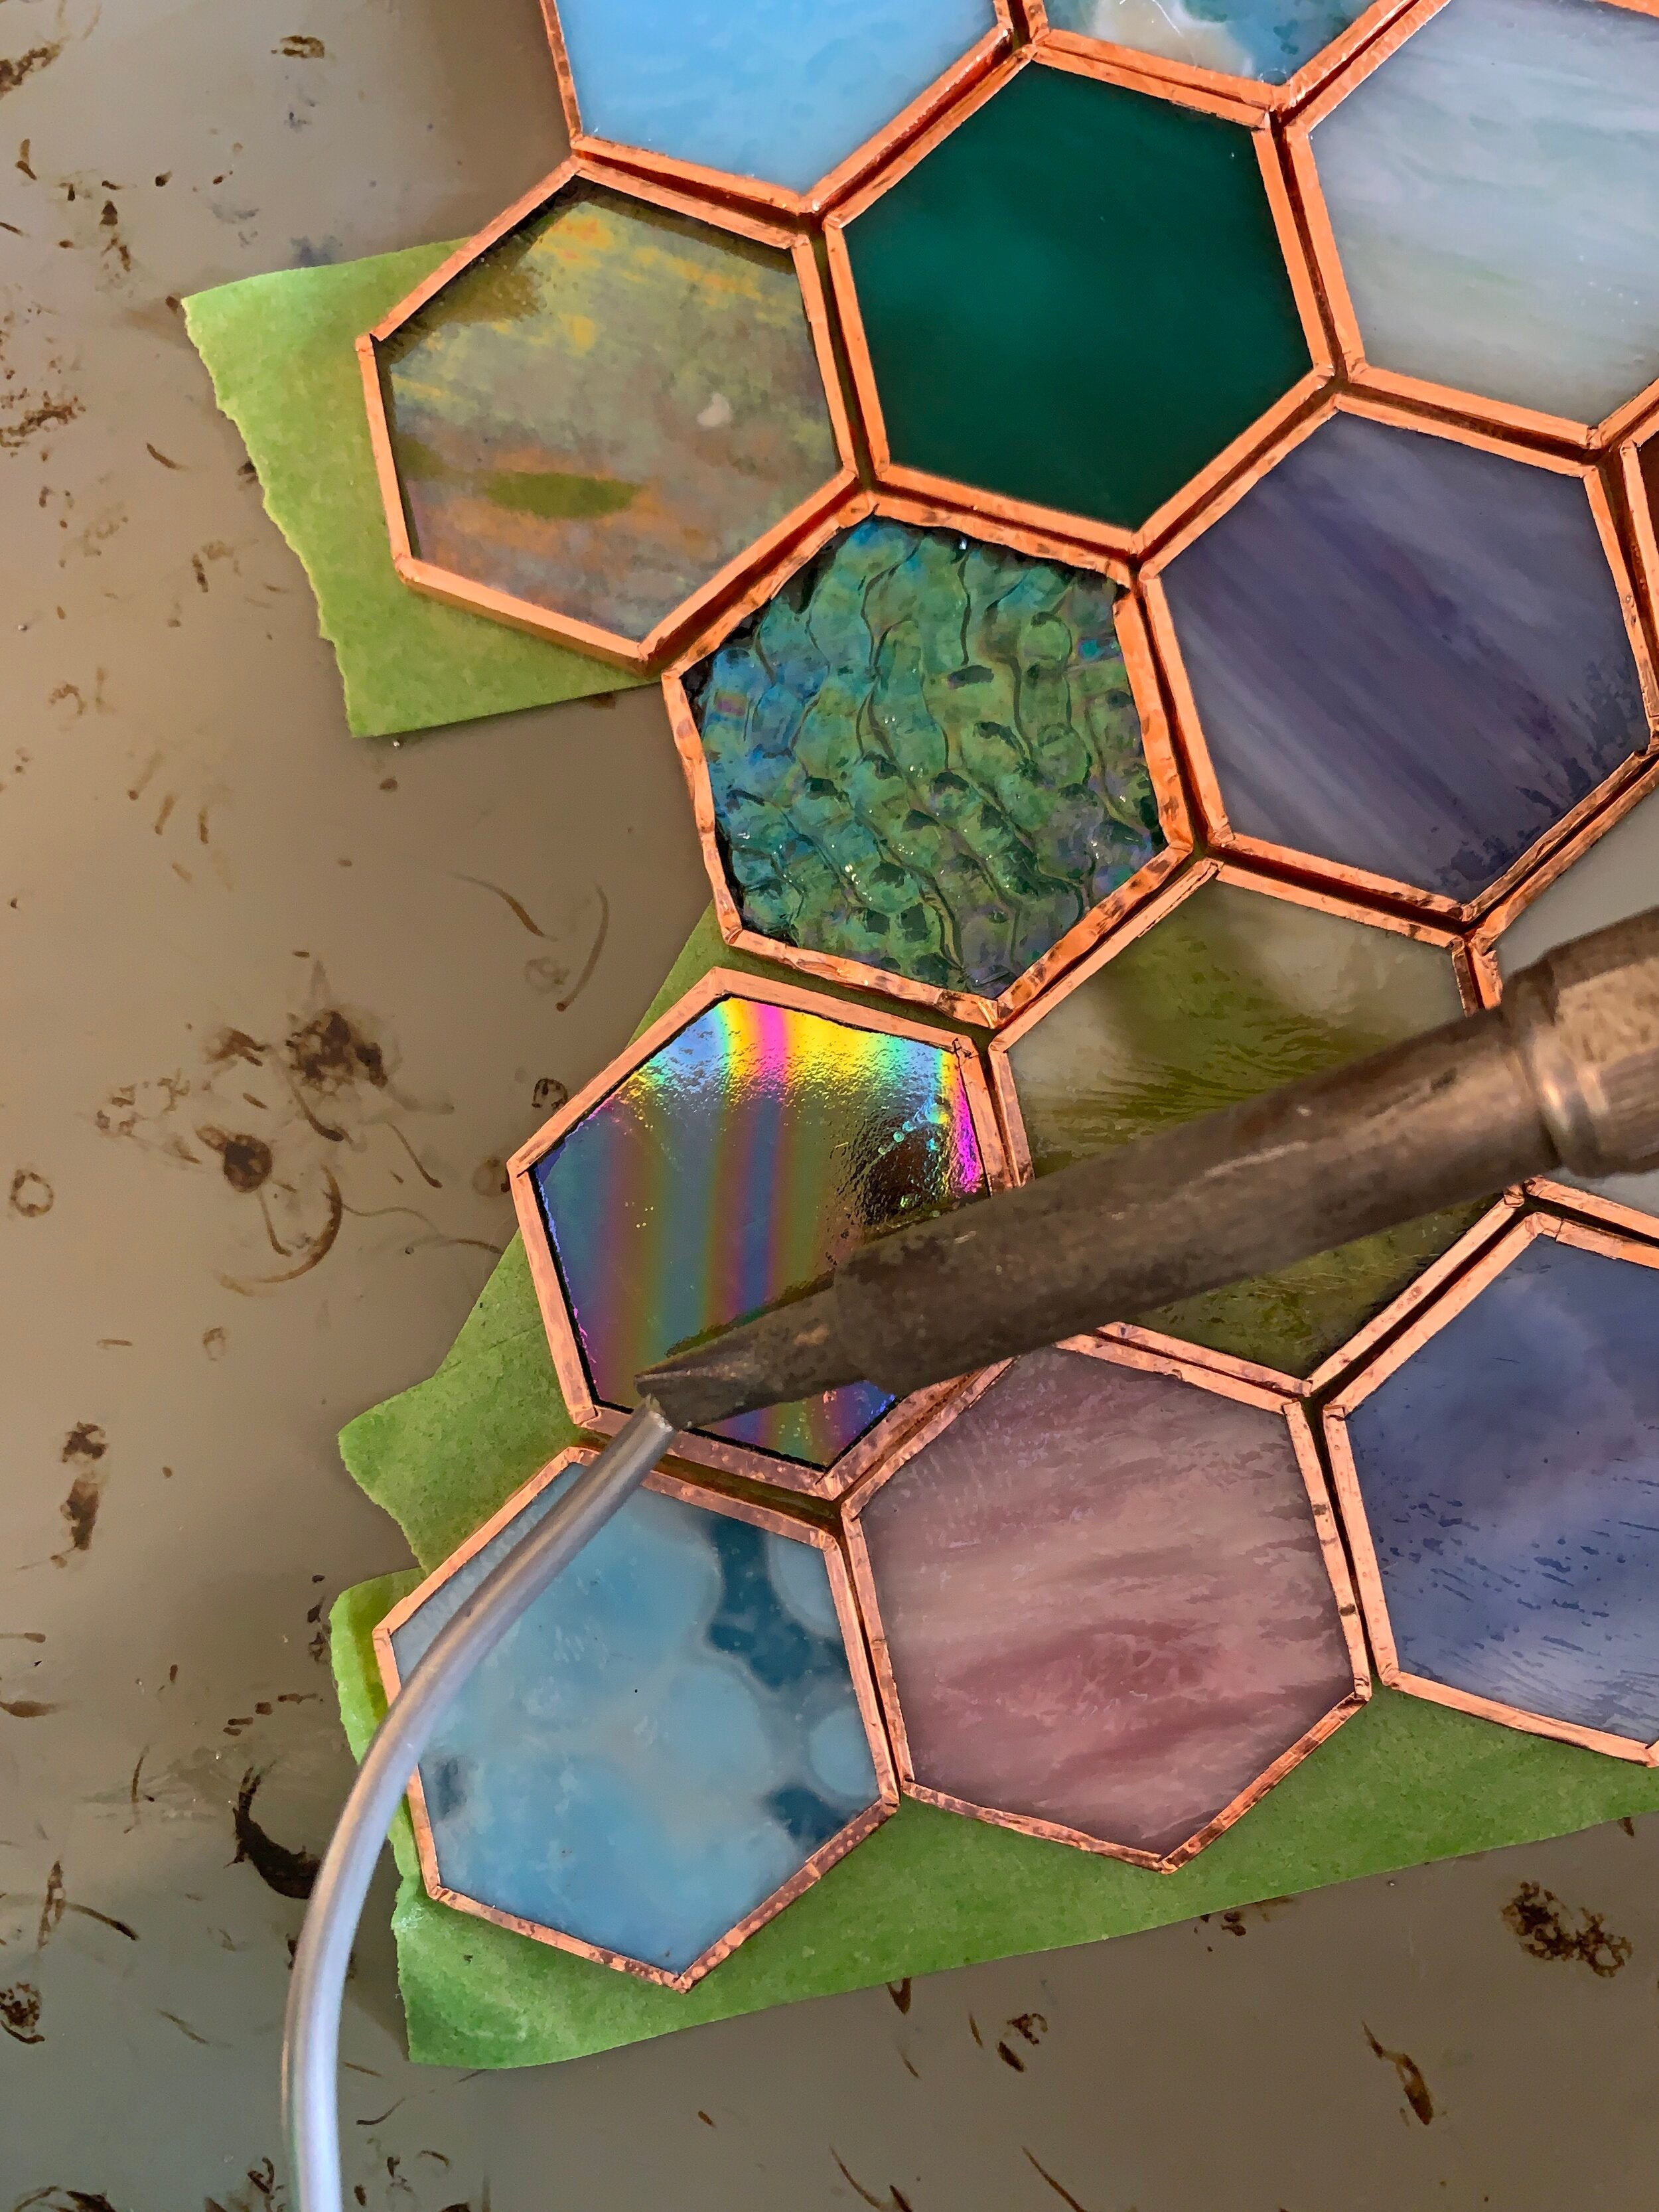
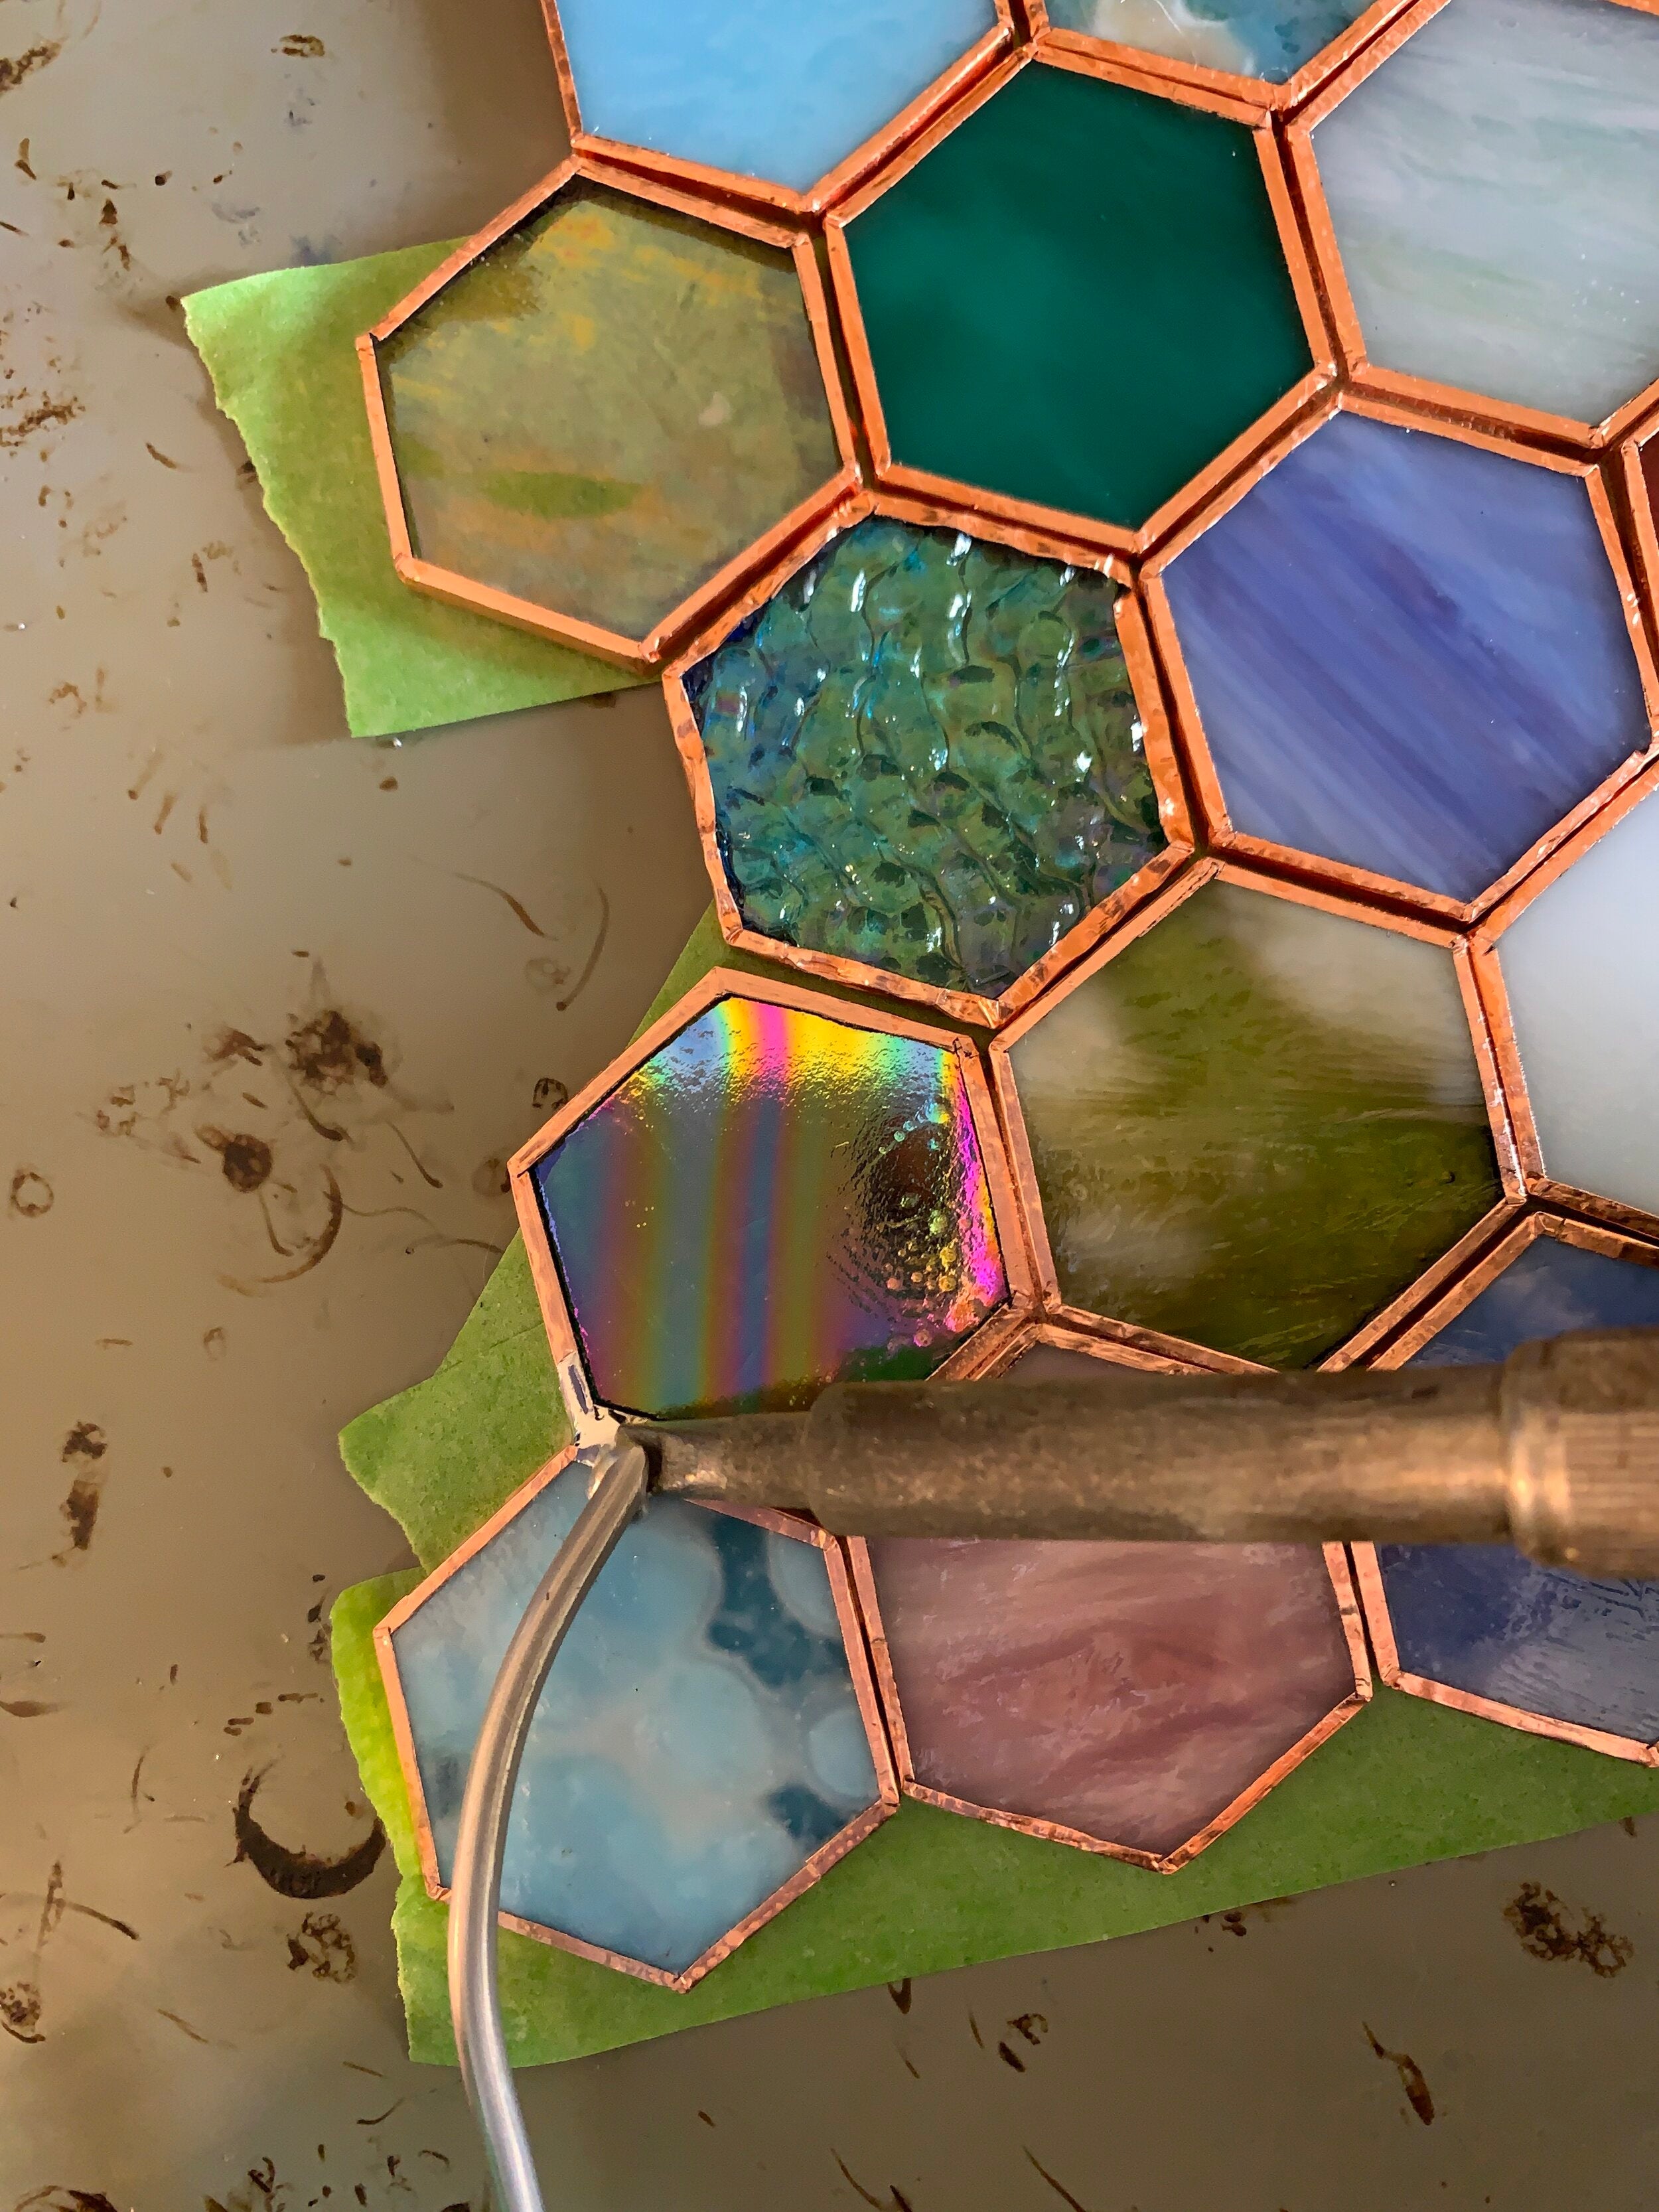
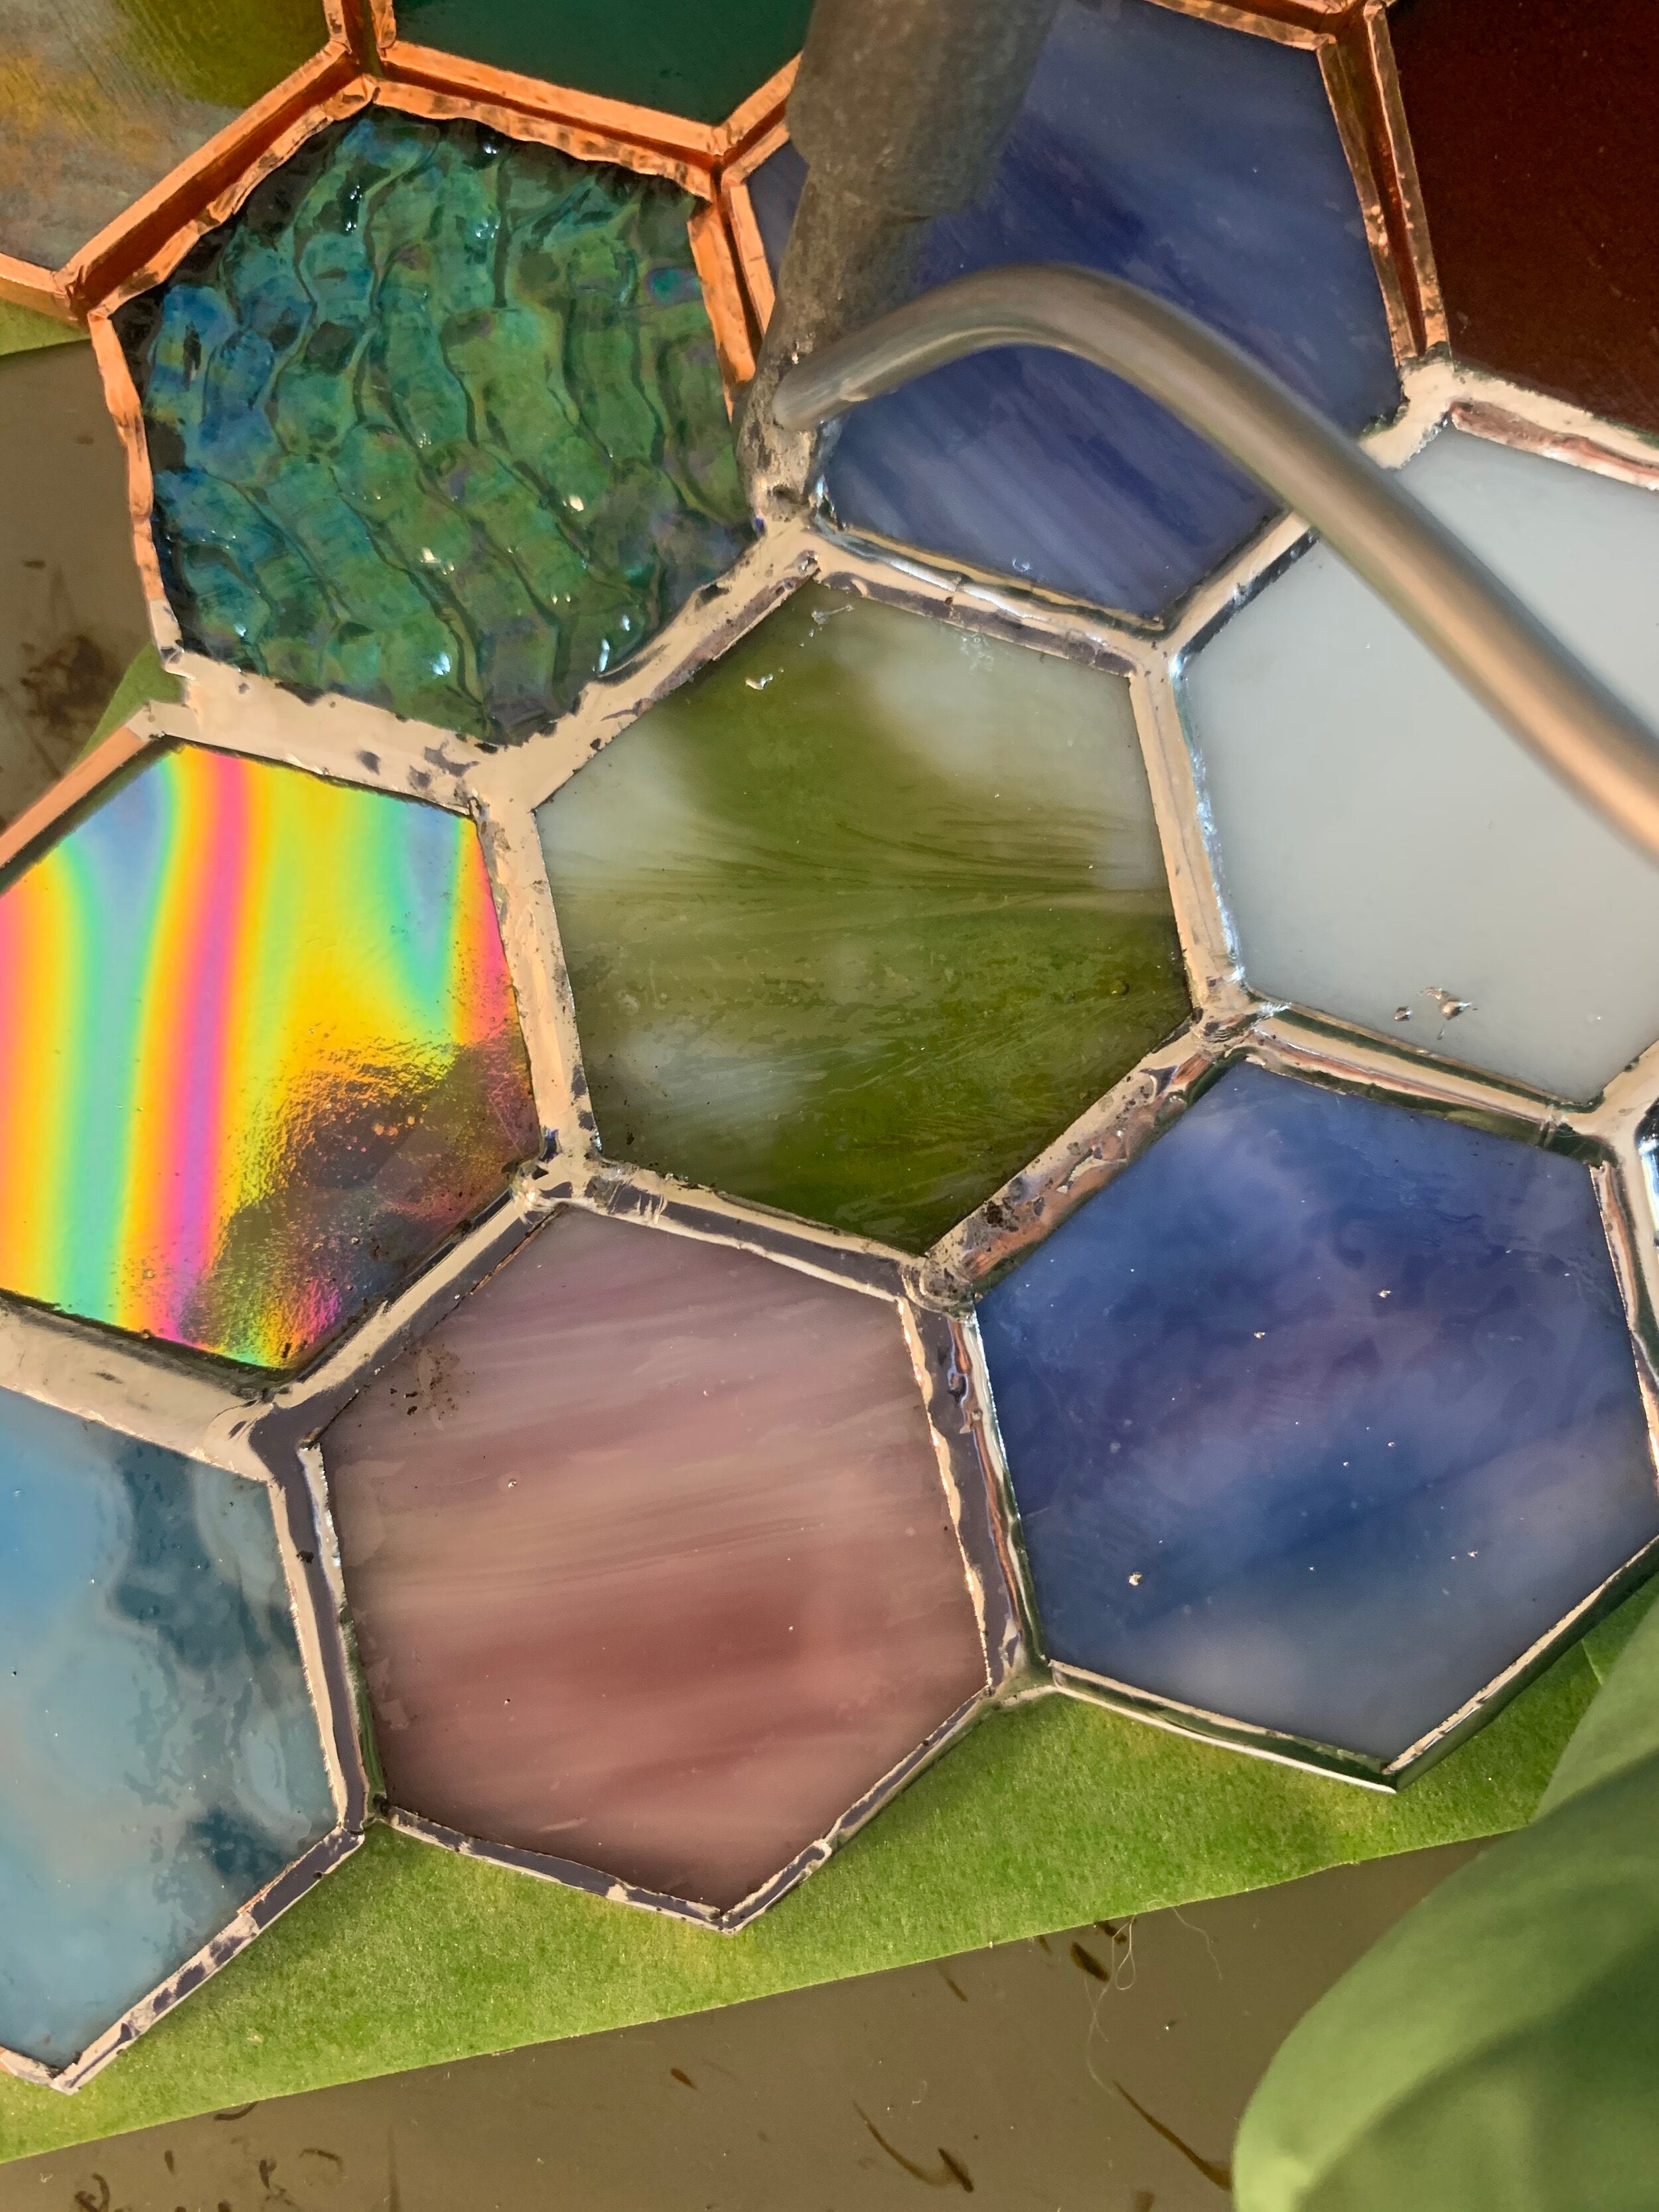
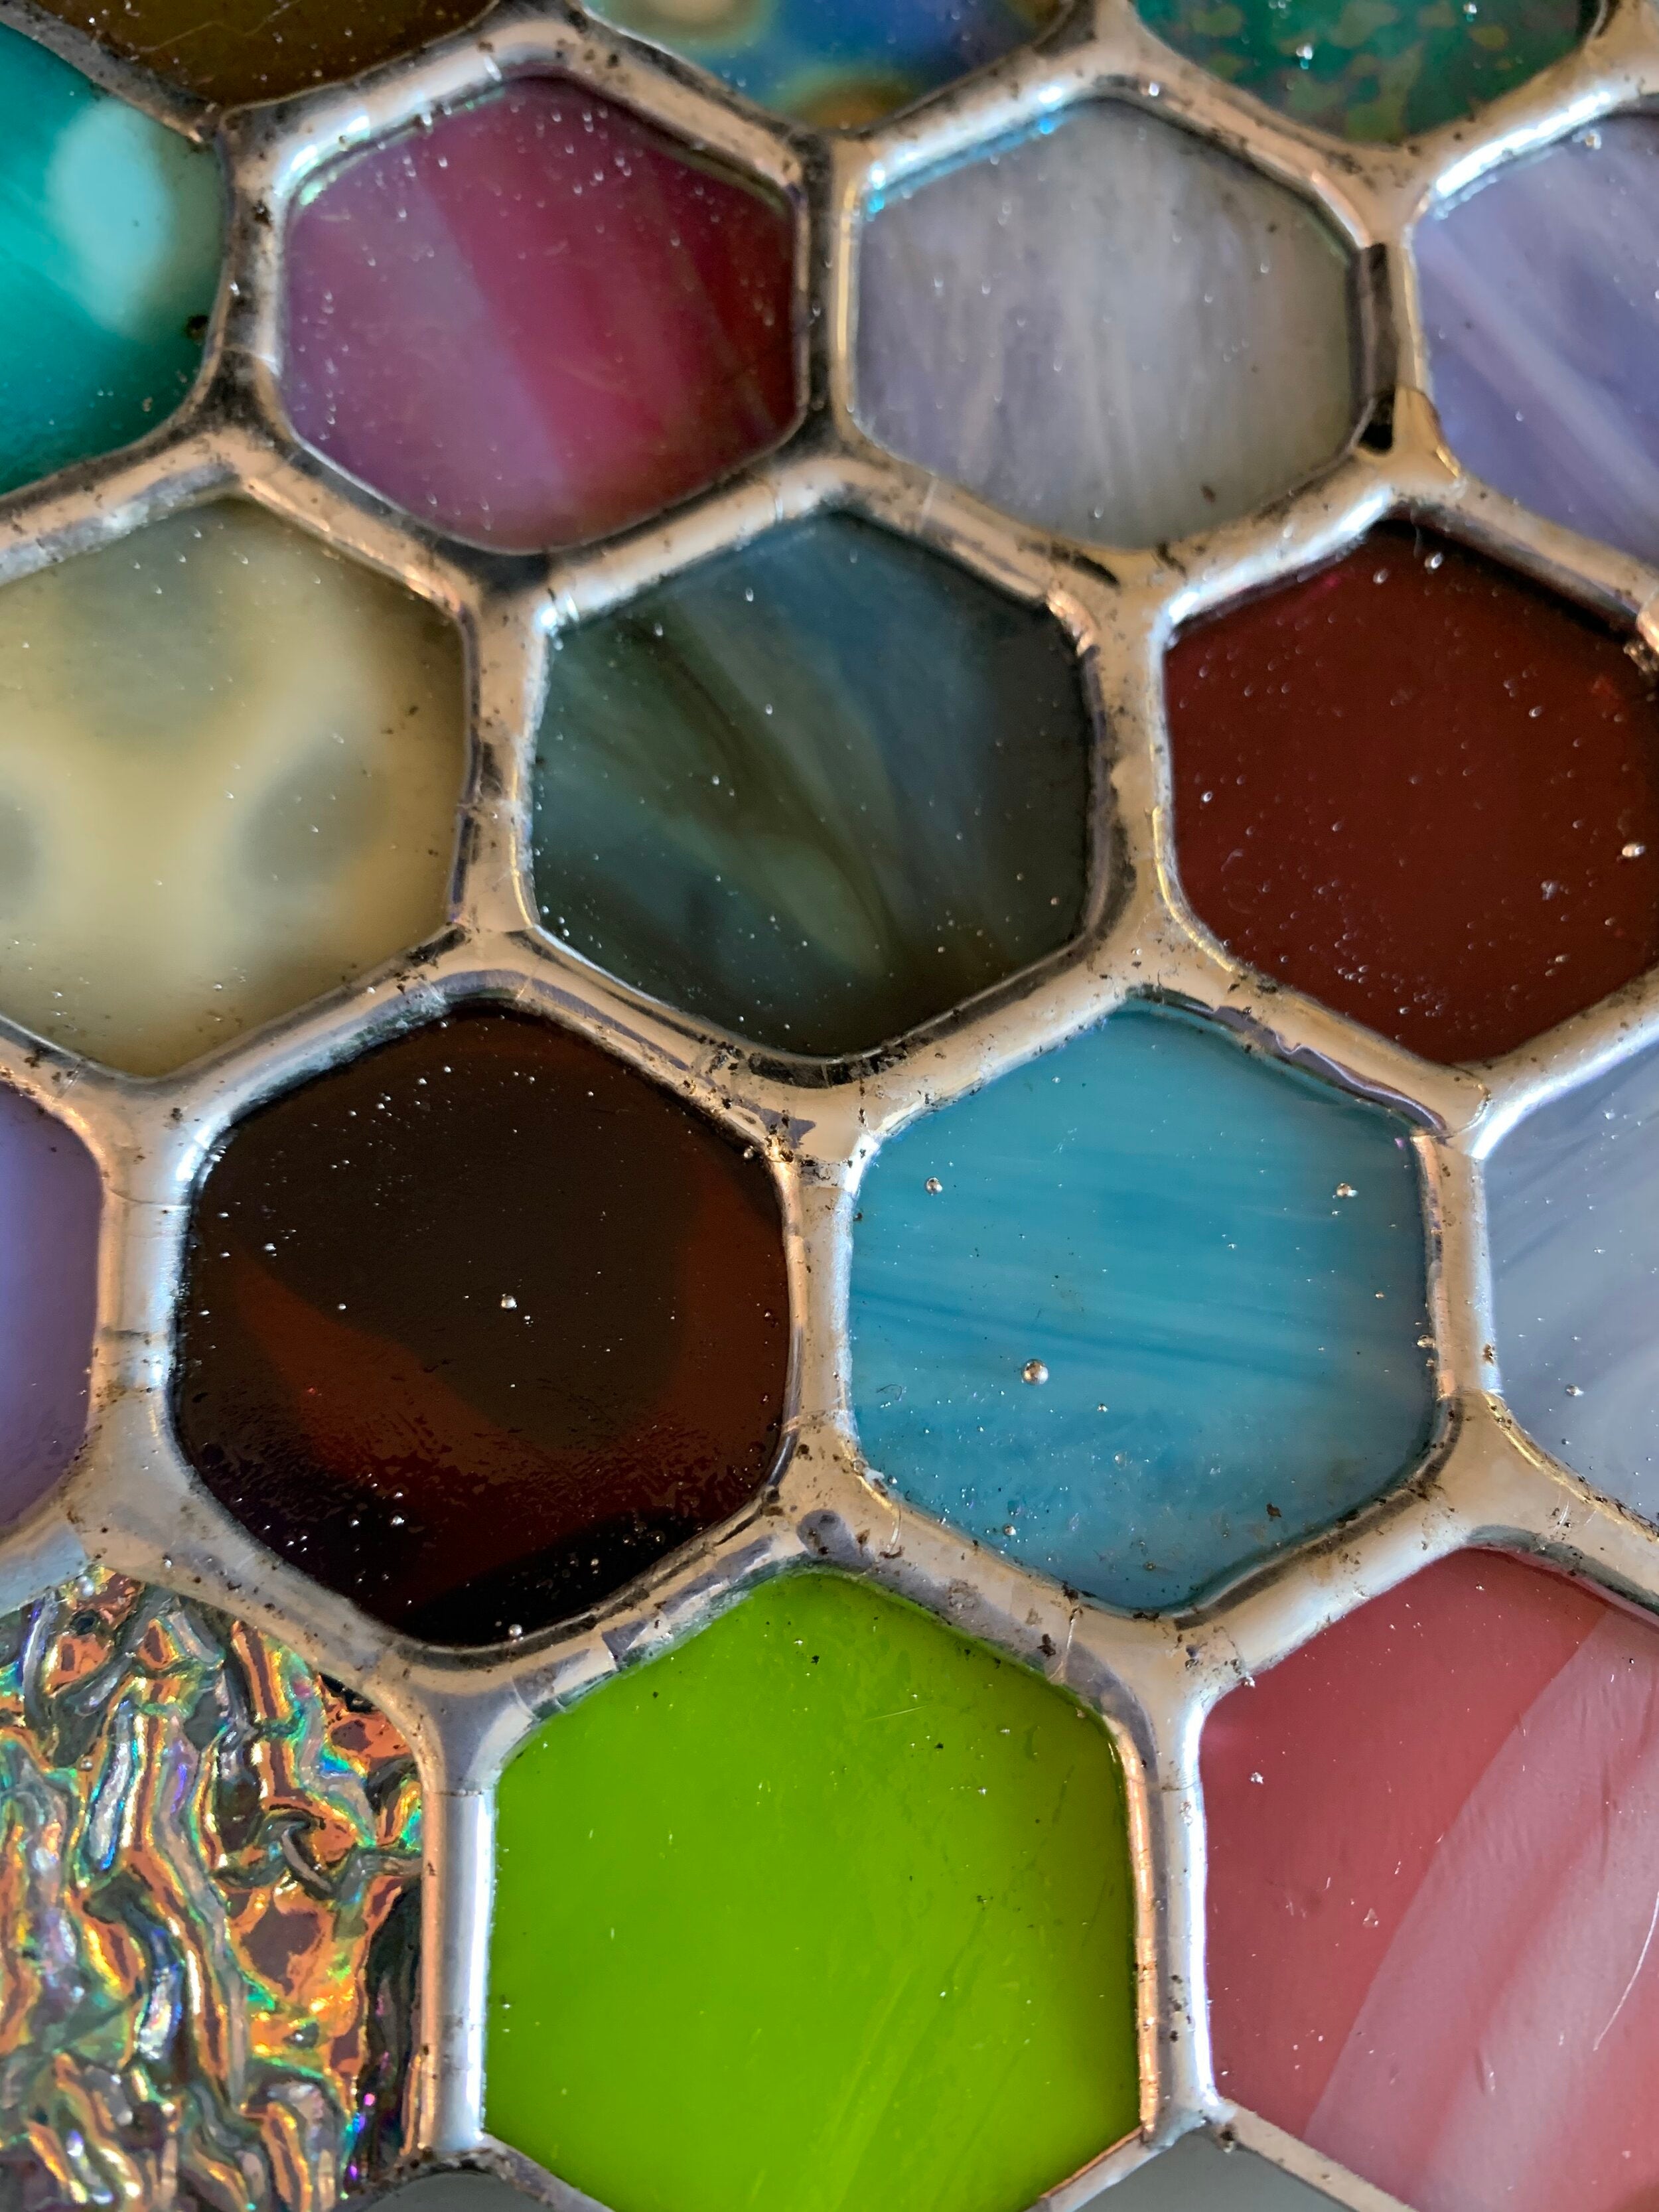
You are going to coat the entire front side in a thin layer of lead. Almost treat that soldering iron like a pencil and your project the paper. Its eaisest to melt lead on the flat side of your soldering iron, with the larger surface area on the tip of your iron the lead will melt quicker, if you find that you melt too much lead as you start don't be afraid to go over the excess lead and melt then drag it to areas where copper tape is still showing. The beautiful thing about lead is we let it cool down and can always go back and make fixes once its cooled if we need to. Also don't be afraid to hold your soldering iron on your project for a bit and make sure that lead really melts between your copper covered pieces, at this stage it would be really tricky to make your pieces crack from heat (that's something we will consider later on). Check out some of the pictures below to get an idea of what tinning/tacking your pieces together looks like. If you would like to see actual videos head over to my instagram highlights or reels to see some videos of me working in action :)!!
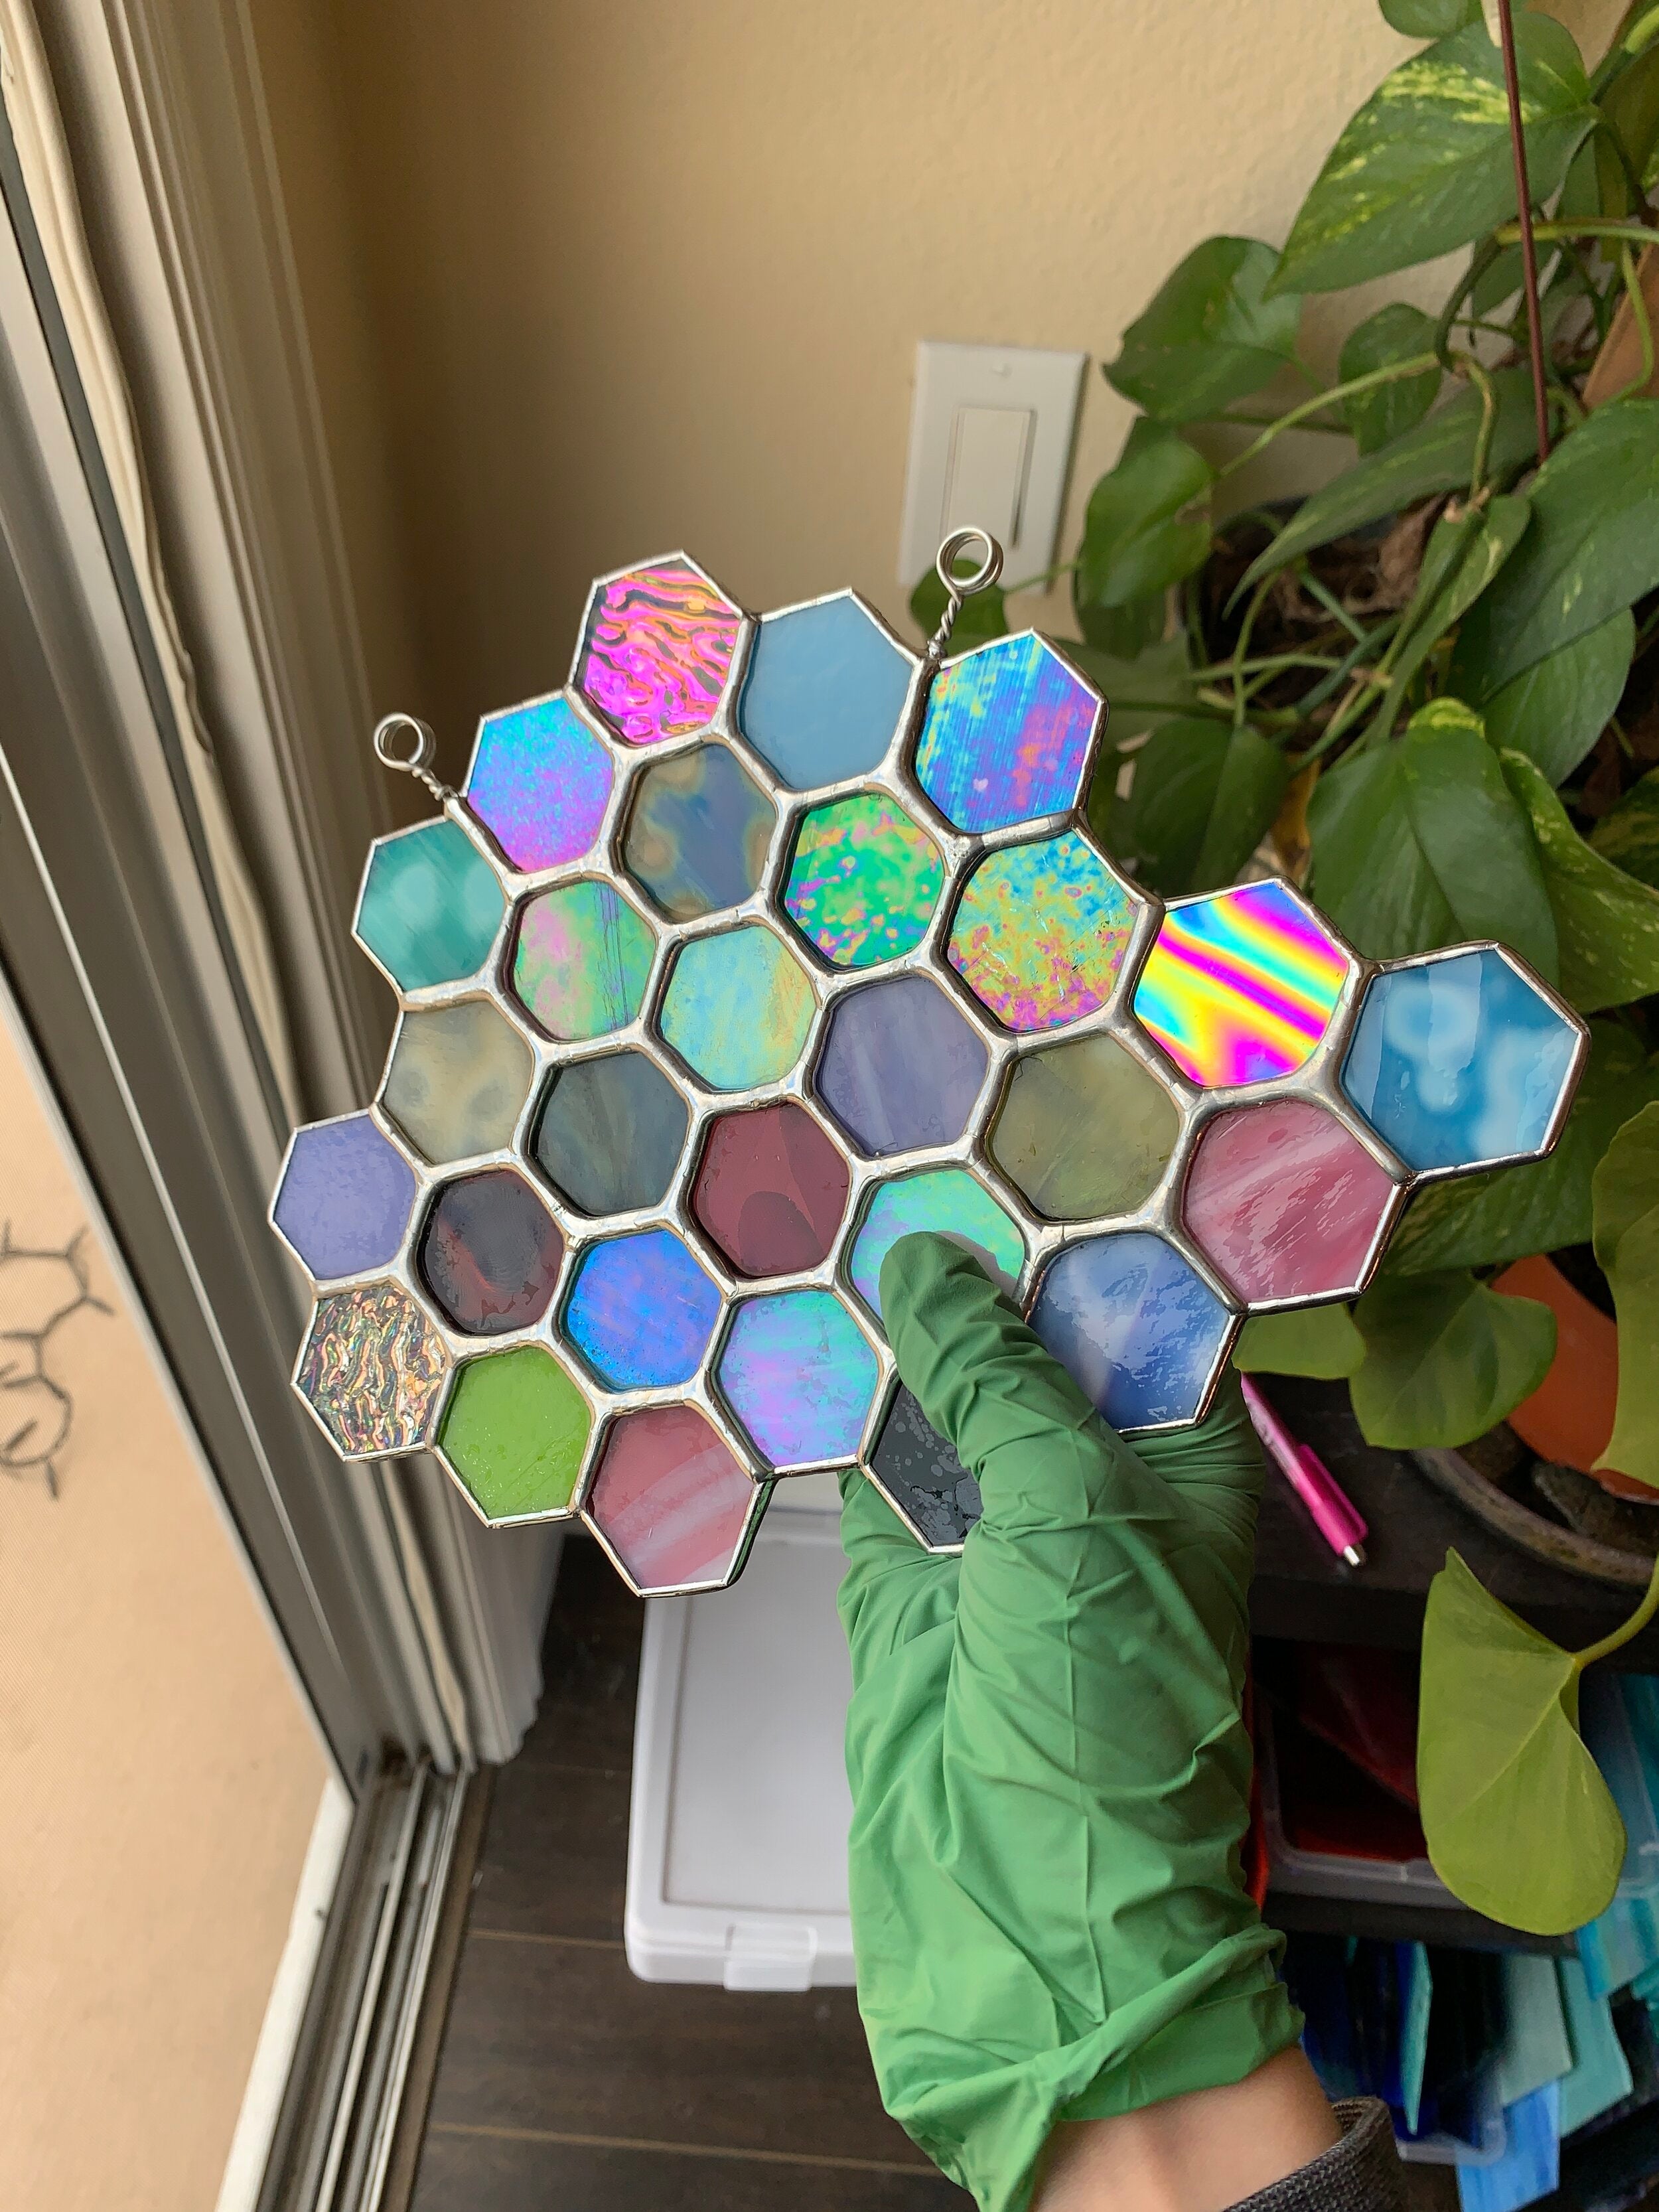
When you have fully tinned one side of your project silver, you're going to gently pull off that painters tape from the other side of your project and do the same exact thing on the reverse side. Make sure your project is fully silver and not a bit of copper still showing. Lastly make sure the outside edges are all tinned if you have them covered in copper foil - this will vary depending if you plan on adding lead came later but if you are making a funky shaped sun catcher like this honeycomb example I have been sharing you will be beading the edge like me, no lead came to finish so we gotta tin those edges!


BEADING THAT LEAD LIKE THERE IS NO TOMORROW
Liquid lead has a personality and I am convinced of it at this point. Depending on the temperature of the room or the spool batch you happen to buy it feels like in my mind it varies in how it likes to behave when you go to melt it. Don't let that scare you because a big thing when it comes when working with lead is just time and practice playing with it. The more you pick up your iron and practice soldering the better you understand how liquid lead behaves. I know its just about the most annoying advice out there but time and patience when it comes to soldering is a big key to getting good at it. Another big help I have found when it comes to soldering, and what has elevated my soldering so much is having an incredible iron. I know it is easy to buy cheap tools when you begin this hobby because as a whole they are all so expensive but make sure to spend a little more than you want to when it comes to a solder iron, and I will tell you why. When you purchase a cheap iron or for that matter most irons on the market they just plug into an outlet and they are on, there is no way to control how much electricity really gets delivered to it. Yes, I am aware external controllers exist that your iron can plug into are on the market but again you have NO idea what degree they are running your iron at - they don't tell you what the 6 setting on the dial stands for. If you want nice soldering lines you need an iron that controls and delivers heat in a very controlled fashion. No other iron works like the HAKKO FX-601. It is so easy for me to be Hakko's biggest cheerleader because their iron is EONS better than anything on the market. If you want to be a successful stained glass artist you need this iron in your tool belt. I have suggested this iron to hundreds of artists and I get messages no joke weekly on how much they love it and how awesome it is. Another message I get a lot is folks asking what temp I like to keep my iron on. I like to keep my FX-601 between 410 and 460 degrees C. I find that keeping it at a higher temperature helps the lead flow best and if I find my lead has any bumps or ripples I can quickly fix a spot on the lead line without difficulty.
Allow me to explain what we are doing by "beading". We are melting a large amount of lead between all of our pieces, this is going to structurally make our piece strong and durable. Aesthetically if done right its also going to make your project look very professional and clean. When you go to bead your piece start by cleaning that iron tip we want it nice and shiny silver. Then as you did when you were tinning your project you are going to do the same when you go to bead except this time we don't want the lead to be thin we want it to almost rest like a bubble between the glass. Start at the edge and touch your lead to your iron and pull them along your lead lines at slow and steady pace. You want to be feeding the lead to the iron so the iron can melt it as you move your iron. It takes lots of time and practice to do it right but with timing you will feed no too much/not too little lead to the iron and pull the iron at a pace that is steady, this is what is going to make your lead lines even. Something I see a lot of beginners do is picking up the iron as they go. Don't be afraid to hold that iron down on your project. Think of it almost like a pencil stuck to paper, if you lift up no words will be written down, again this takes practice but if you pick your iron up too much as you go your lead won't melt evenly with the heat change. If you hold your iron on too long you will find that your lead will melt though the gaps of your pieces. If this happens don't panic, as you have probably seen by now lead cools quickly so just sit down for a moment and WAIT for that project to cool - if you don't wait for the temp to come down one of two things can happen. One your lead will continue to melt though the gap and/or two you could cause a heat crack to occur, which is about the worst thing that can happen when soldering and you'll need to repair it before continuing on. Eventually I will do a whole blog post on repairs but for the time being PATIENCE is your friend. Its important to not be too tenacious when soldering because walking away and waiting for a moment can be your best friend when doing this step. Many a times I should have walked away and waited for my lead to cool because I ended up messing my project up worse by pushing the limits.
Fixing ugly spots - Ripples, funky spots, and the occasional air bubble come with the territory and if you're a perfectionist like me they will drive you crazy lol!! The only way to fix these funky spots are to either one completely go over your bead again (drag your soldering iron slowly and steady over the bead you've already laid down in hopes of making it look better OR take the tip of your iron and almost holding it straight up and down like a pencil gently touch the weird spot with your iron, hold for a second and slowly pull your iron straight up. There may be other methods out there but these are the two ways I fix funky spots!! P.S. its really impossible to get perfect lead lines or I just don't know that secret yet, let the small imperfections go likely you will only notice them ;).
Help my lead is rolling off the edge?? - This is something a lot of beginners experience and its totally normal. Because your edge will get hot quickly lead loves to melt quicker towards the edge. This again takes time and practice (sorry I know there isn't an instant fix) but the longer you spend time playing with lead the better you can feel when to pull up your iron to stop that lead from flowing. My recommendation don't hold your iron on your edges too long or they melt quickly be quick when it comes to having your iron on the edges.
Why is my lead not melting? - You gotta keep that iron tip clean as you go! Make sure you are cleaning your iron off with that metal tip cleaner or your wet sponge. Lead gets gunked up on the iron as well as crap from the flux as it reacts so remember every few passes to give it a good clean. Another thing I have found helps is sometimes re-applying flux can help lead flow better, the flux likes to dry over time and if you take too long this could be another cause for lead not melting (not enough flux).
Uneven soldering - It happens to me ALL THE TIME, I like to use glass that varies in size and shape, leaving me to funky soldering lines at time. The more you play with lead the better you will get at working it and manipulating it. If your solder is thick and even on one side and thin on another you can always go back and build up that thin side. Let that lead line cool and come back with some solder on your tip and touch it quickly to the thin spot, this method will help you fix and build up those thin lead lines.
What do I do if my solder pools in one spot? - Melt it off easy as that! No really just melt it off an start over, one of the best parts about lead being a bit fickle is if you don't like how your lead line comes out or it bunches too much at one spot you can just melt it off and start over. Again be sure to wait for it to cool down completely before you try to add lead again, if you don't you may overheat the glass and it may get a heat crack in it!
Horrid Heat Cracks - Once in a blue moon you'll be punished with one. This mostly happens in thin sections of glass that get way to hot. You can either accept the heat crack (maybe it isn't in a place where you can fix it or would be too impossible to repair or you can melt out this piece of glass and re-cut + replace with a new one. You will have this happen to you at some point, don't freak out just take a deep breath, acess, and then get to work and frame it in your mind as good work experience - it's important you don't crack under pressure.
Soldering Examples - I have TONS of examples of me soldering and tinning in action under the SOLDERING tap in my highlights on my Instagram page @Coloradoglassworks. My lovely website doesn't let me do videos and I'm not much of a video maker so if you want to see what I am talking about check out my IG.
MOST IMPORTANTLY: BE NICE and have some grace for yourself. SOLDERING IS FRUSTERATING. Trust me I have had to stop myself from throwing projects on the ground, I have even cried over a few projects that just weren't soldering my way. Some nights soldering has been quick and seamless for me. Like I said a bit back lead has a personality at times, just go with the flow. So much of being good at soldering is just practice and knowing how to work that lead with a good tool. So have patience know that doing this is HARD and even 3 years in/soldering weekly I still struggle with it. But you will be your own biggest critic and nobody I promise you will see the same imperfections you do so just a kind reminder to have grace and know each time you solder you do get better and better!


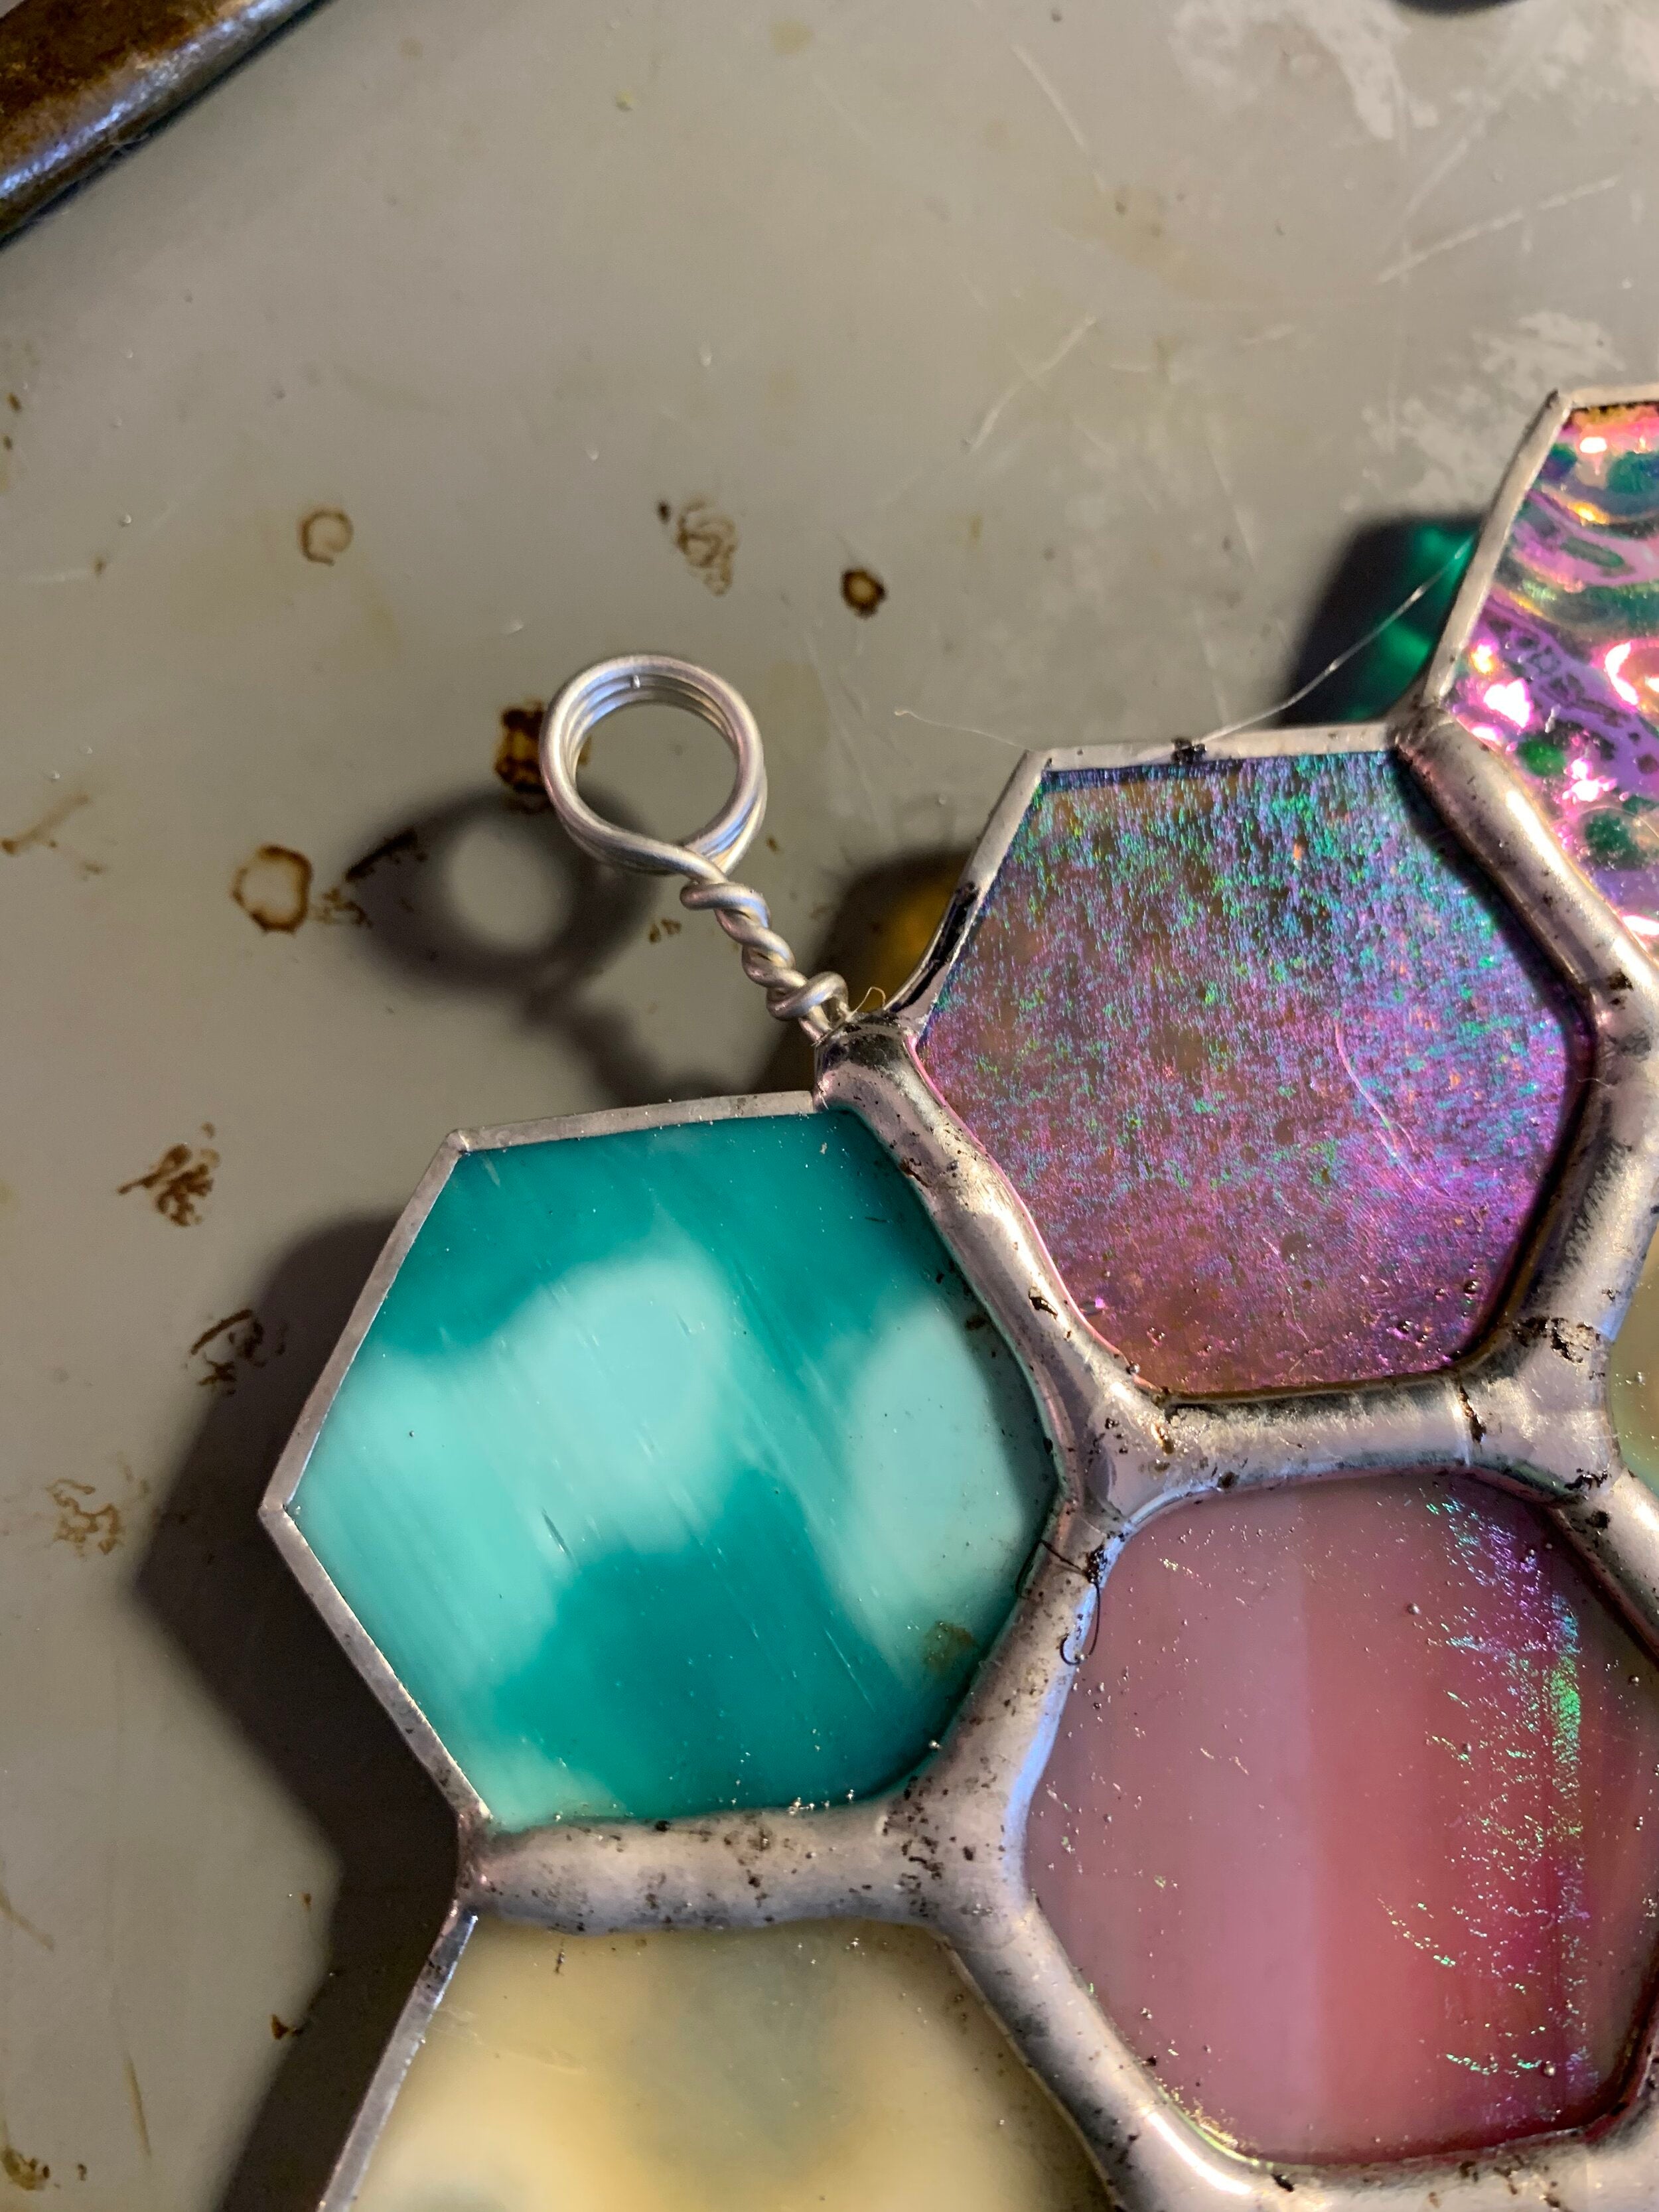
BEADING THE EDGE (THE FINAL STRETCH OF SOLDERING)
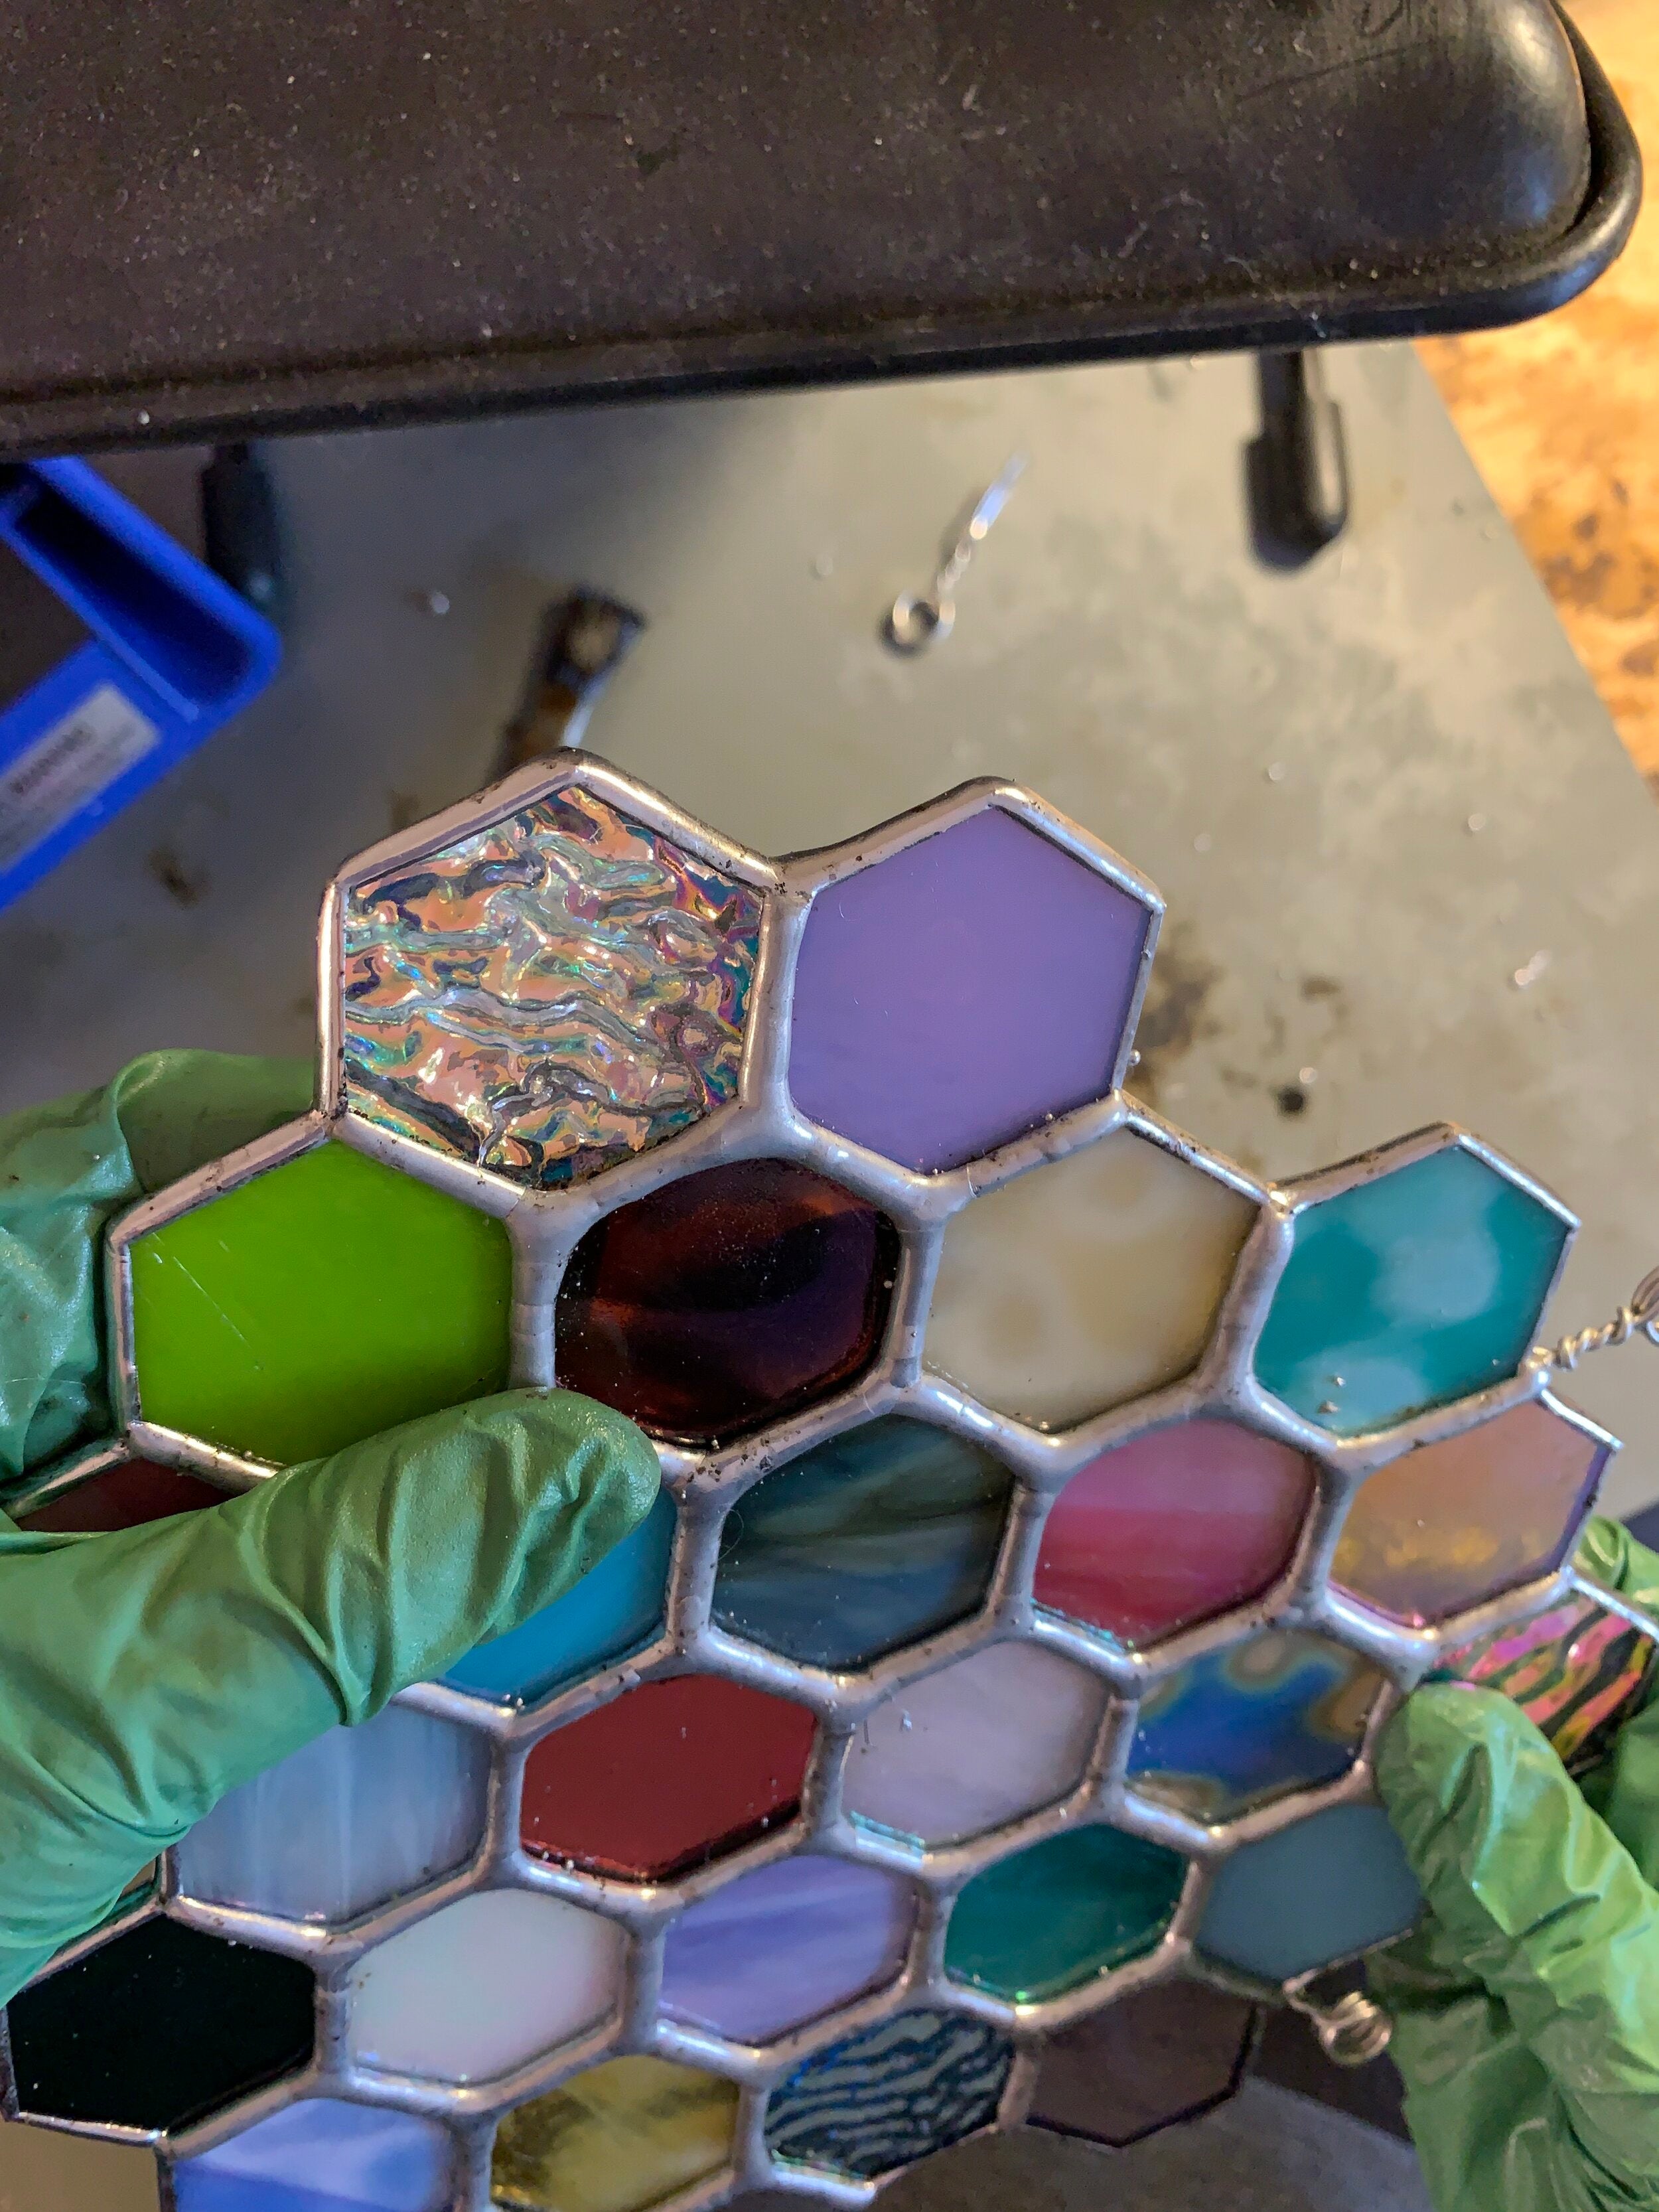
YAY! So you've soldered your entire project, you've fixed every ripple and can say you are at least decently pleased with the soldering on your piece. You are so close to being done but there is one final part to take care of and thats beading the edge of your project. Now this is totally your call and will come down to how you want the final piece to look. I reccomend at minimum beading the edge if you aren't going to frame in lead came or can't frame it. It just makes the project come together nicely and adds more protection to those exposed edges. Tapping your soldering iron at a speedy pace is going to be the trick to mastering doing this part of soldering. Unlike beading or tinning there really isn't grace for the edge because the surface area is so little it will heat up quickly and melt off. Don't punch me but again time and practice is going to be another key to mastering this (I know I'm sorry). Unwind that handy spool of lead you have and use the tip of your clean shiny iron to pick up just a little bit of lead so you you have enough where your iron has lead on it but its not fully melting off. You want to pick up just the right amount of lead because you are going to melt it little by little on the surface of your edges as you go. If you try to grab too much lead it won't cling to your iron and will pool on your work surface, don't grab enough and you'll have nothing to melt on your piece. You'll have to get a feel for just that right amount. Anyhow take that little bit of lead on your iron and tap it (1 Mississippi is how long - 1 or 2 seconds) and lift your iron. A little bead should remain on your edge. Depending on your surface you will build as you go. With these below pictures one tap holds enough lead to cover the length of one honeycomb edge. Take notice of how different my project looks once its beaded. This will take practice, its very hard to explain this via blog entry so I'm sorry if my words don't fully make sense!! Check out my pictures below to get a better idea!


CLEANLINESS IS NEXT TO GODLINESS
Did I just mention an acient idea/phrase to get you to take cleaning your project seriously? You know I did. Cleaning your piece is key for making it stand the test of time. If you don't take the right steps to clean it, over time it will get gunky and oxidize, and P.S. if you ever plan on selling your work you definitely don't want that to happen. Once you finish soldering we need to get that flux off your project ASAP. There is no better way to do this than by using Kwick Clean. This flux cleaner comes in a handy spray bottle. I like to take it and spray the heck out of my project one or two times, using a paper towel to dry it off. Kwick Clean is going to neutralize the acid flux which is key for preventing your project from oxidizing. Once sprayed down I like to get my project extra clean by giving it a good wash under warm water and Dawn Dish Soap. NOW I have a water softener system installed in my home and I know many of you live in different parts of the country or world so for good measure if you aren't sure the mineral content of your water make sure to clean your project with warm distilled water when in doubt! Really suds it up too!! After your done washing it should be beautiful and super silver shiny.


LAST BITS + LEAD CARE
With your project all silver sparkly clean at this point you can wax + polish your piece or change the color of lead with copper or black patina then polish. I will cover all the ins and outs of project finishing in my next blog post but for now the soldering step of the process is complete. I did want to make one last mention of lead care, you do need to recognize you are working with lead and its a substance to be very conscious of, too much of it in your body is not a good thing. That said you can totally manage your exposure and I'm going to share a few times on how I manage my exposure.
- Do not eat or drink near your soldering space (you get lead in your body from only two ways: inhaling or ingesting). It's smart to keep food and drink away from your work space, just wait till you're done.
- Wear a mask when you solder, you likely won't run into lead fumes (they burn at approx. 480 C) but it's just a smart thing to do in case!
- Wear soldering clothes, don't solder in your street clothes if you can help it, I try to use my grubby clothes but I'm not always perfect!
- Shower after you solder, I almost always do this if I have been soldering for longer than an hour, I will wipe myself down with a lead off wipe at minimum but I always shower if I have been soldering for more than 1 hour.
- Wash your hands always after touching lead - ALWAYS
- **Blood tests, I have to admit I HATE getting my blood drawn and have only done it a few times (my levels always come back normal), if you want to be extra careful this is how you can moniter your levels, most likely you would only need to do this if you were working with lead daily, I don't BUT it's about time I get my blood drawn to check again...ugh lol.


I hope you found this soldering tips and tricks blog post helpful, if you need any clarification or additonal resources feel free to reach out to me I am always here to help you grow as an artist :). Make sure to give yourself a big pat on the back, you have a lot to be proud of. Soldering is not easy but YOU CAN DO IT and the more you do it the better you will get - seriously don't give up because you will grow from the hard moments, heck I sure do everytime ( don't forget I still have them after doing this for 3 years). Take care friend and see you into the new year with more stained glass tips and tricks!!